


Mountain Geolocating Guide

Introduction:
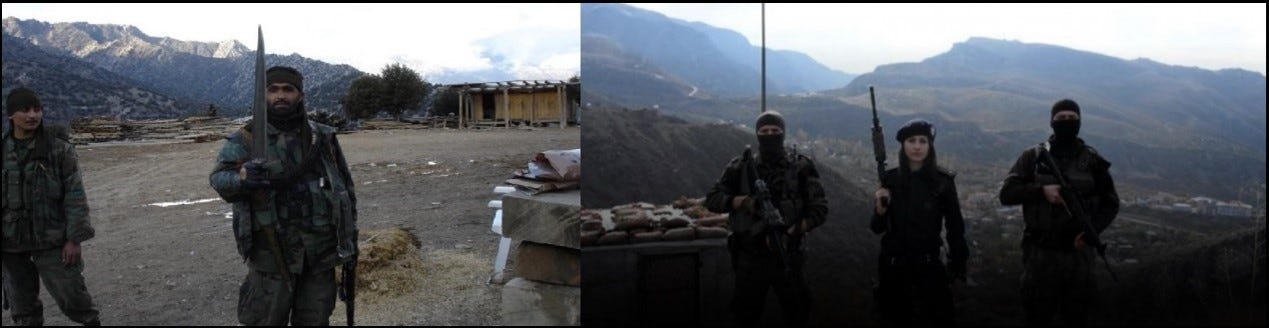
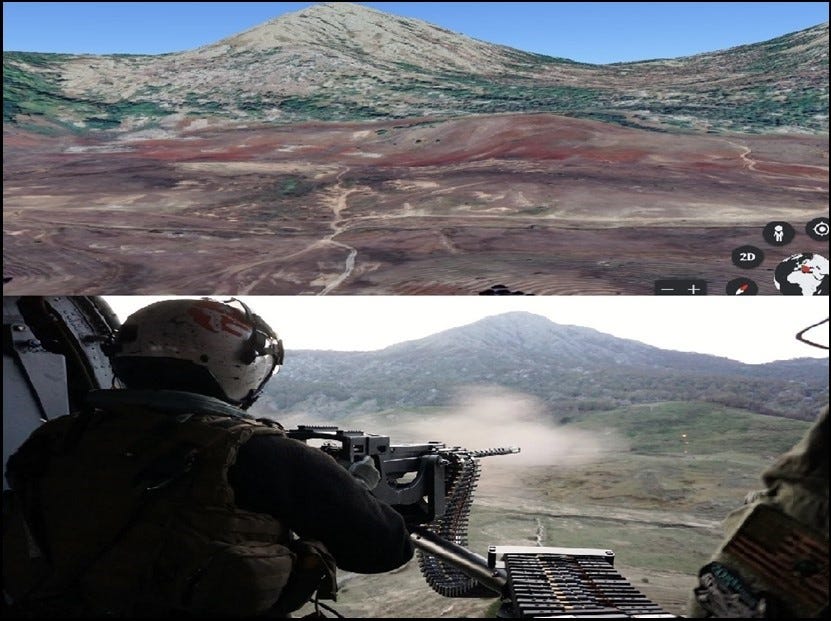
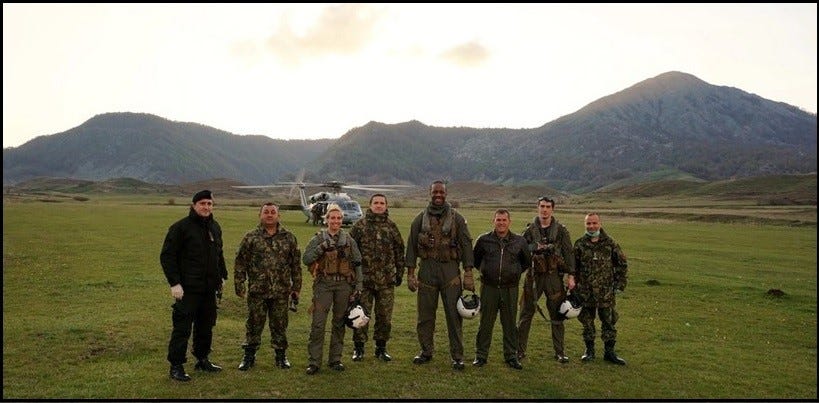
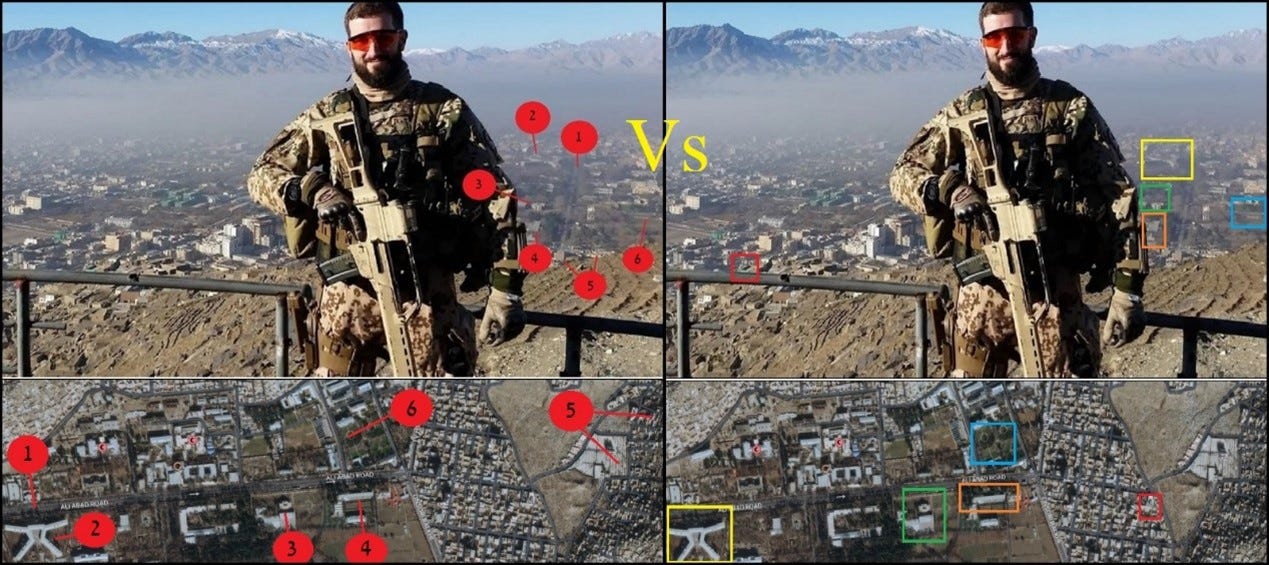
I choose these two photos as an opening to this guide because they are fascinating, at least in my opinion, a stunning view in the background, alongside images that reflect war, and especially because they are some of the most challenging, I have come across. The ability to geolocate these images is almost impossible, especially when there is not much to hold on to. The mountains in the background are the biggest clue to the location of the warriors in the photos. We will return to them towards the end of the guide.
In this guide, I will include several tools that can be used to geolocate locations only through the topography of the mountainous surface.
The Google Earth platform in its current version lacks mountainous realism. However, there are still areas where the level of realism is high and very close to reality but still not perfect to be based on a realistic surface.
The first tool is also the main one in the field called: Peak Visor. It is a web-based platform that contains realistic data of the world topography and allows its version to compare the contours of the surface topography to the topography in the image by simply uploading the image to the platform after entering the location data and hence the way to find the most accurate location.
The second tool called: Peak Finder is also a web-based platform. It allows you to upload an image for comparison only in its mobile version and it is still in the development and upgrade stage. Its topographic data is realistic including contours and elevations and is mainly used to identify mountains online when hiking by photographing the surface and uploading the image after entering the location.
The third tool is called: Peakery is also a Web-based platform. It does not allow image upload for identification or authentication but has a lot of information about the mountainous surface and has many choices for maps including 3D topography and a satellite map of much better quality than Google Earth. This tool is mainly used to identify the location using a realistic three-dimensional surface.
I will introduce each tool individually, but without a doubt, Peak Visor is the winning tool when it comes to topographic surface identification and has a highly professional interface compared to the other tools mentioned.
We will now start working with the selected tool in parallel with the Geolocation capabilities.
Peak Visor does not come at the expense of everyday Geolocation methods. It has two goals. Its main one, finding an accurate location especially when it comes to wide open or mountainous areas that have nothing to hold onto, location identification compared to the topographic surface (peaks) can be very accurate and a second goal is location verification when there is a suspicion of misinformation or misinformation.
I have included several case study representatives, with varying degrees of difficulty, and hope you will enjoy the mentioned tool because it is truly an asset to any Geolocation analyst.
At the end of this guide, I’ve included an appendix with some tips and a semi-Bootcamp for your practice.
Have a great read!
Bizë, Albania Case-Study
This a classic example of geolocation in a mountainous area.
Helicopter Sea Combat Squad training together with the Albanian army in the mountains of Albania. The link to the article source is here.
I’ve selected several representative images. The ability to determine the exact location of the helicopter is not simple but not impossible. From reading the article we can understand that the training took place around the village of Bizë.
In an initial Google Earth search the area will look like this:
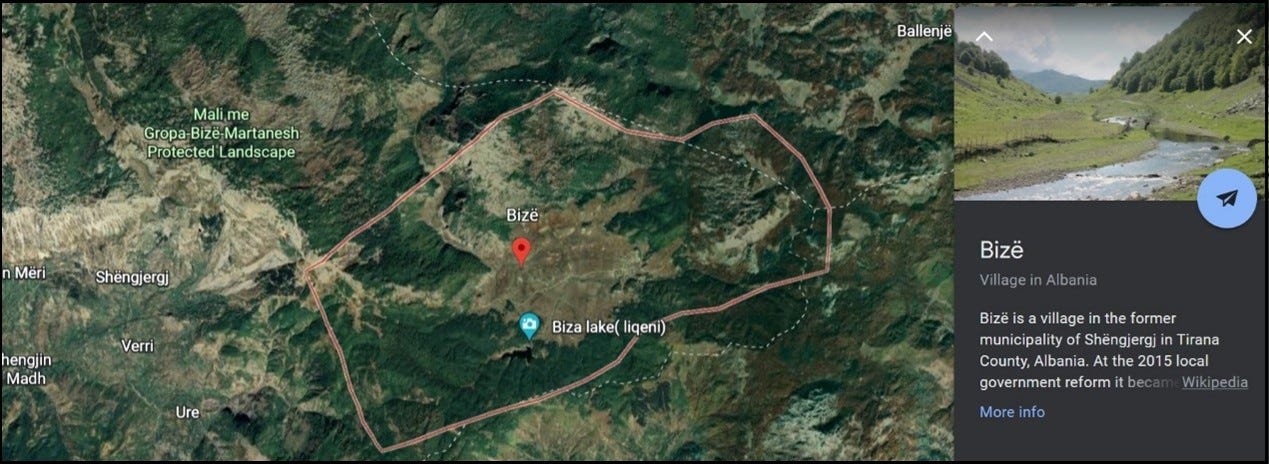
This is not a small mountainous area. Where and how do we start?
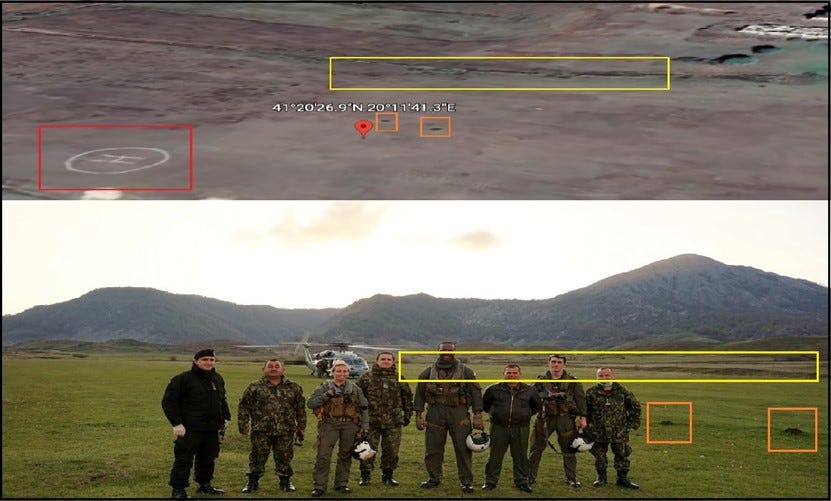
Let's start with the first picture. We can consider the mountainous topography in front of us, the stream channel that is at 12 o'clock, and the prominent and unique terrain route. We will go through the map for a three-dimensional view and in the search, the surface will already look clearer.
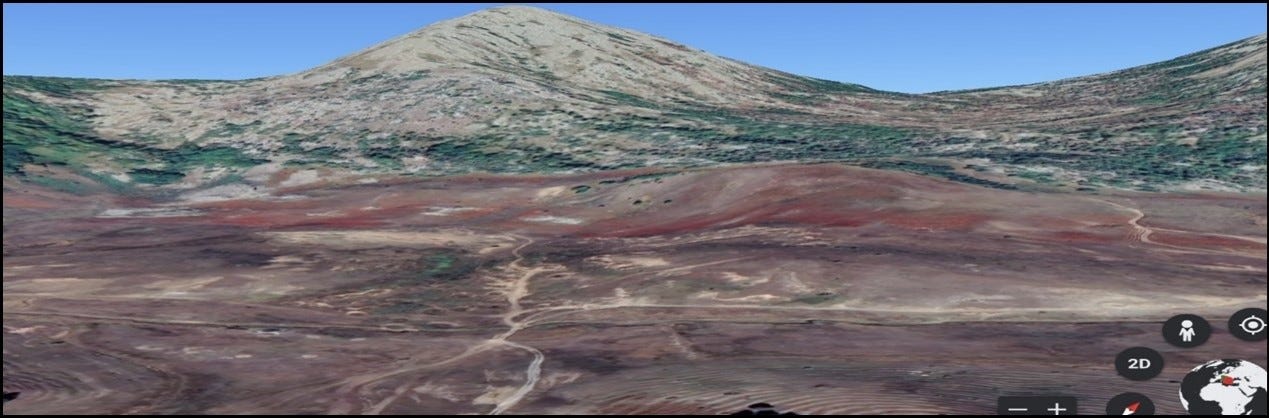
And in a close-up comparison, it would look like this:
If we make a comparison, on the surface we will understand how simple it is:
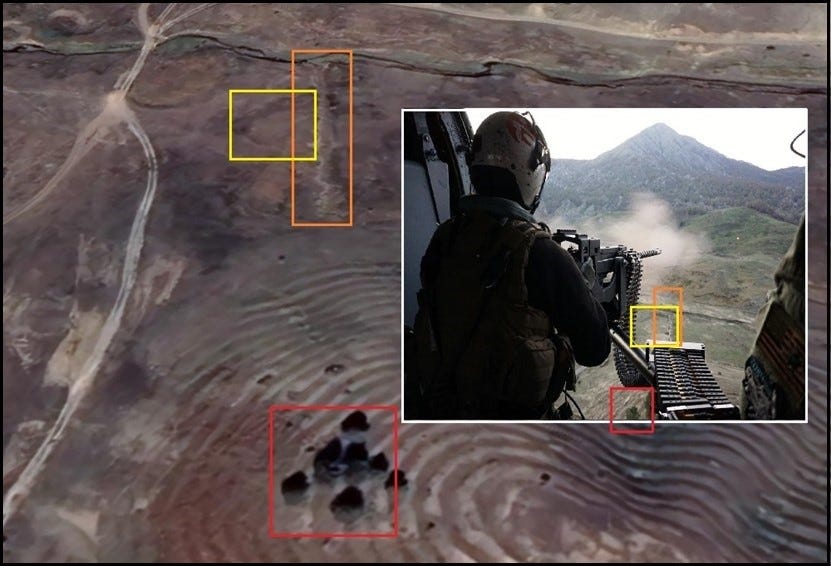
The stream channel is located at the helicopter’s 12 o'clock, the unique terrain route near the stream channel, and even the group of trees located below the helicopter location with a complete adjustment to the prominent and special surface route.
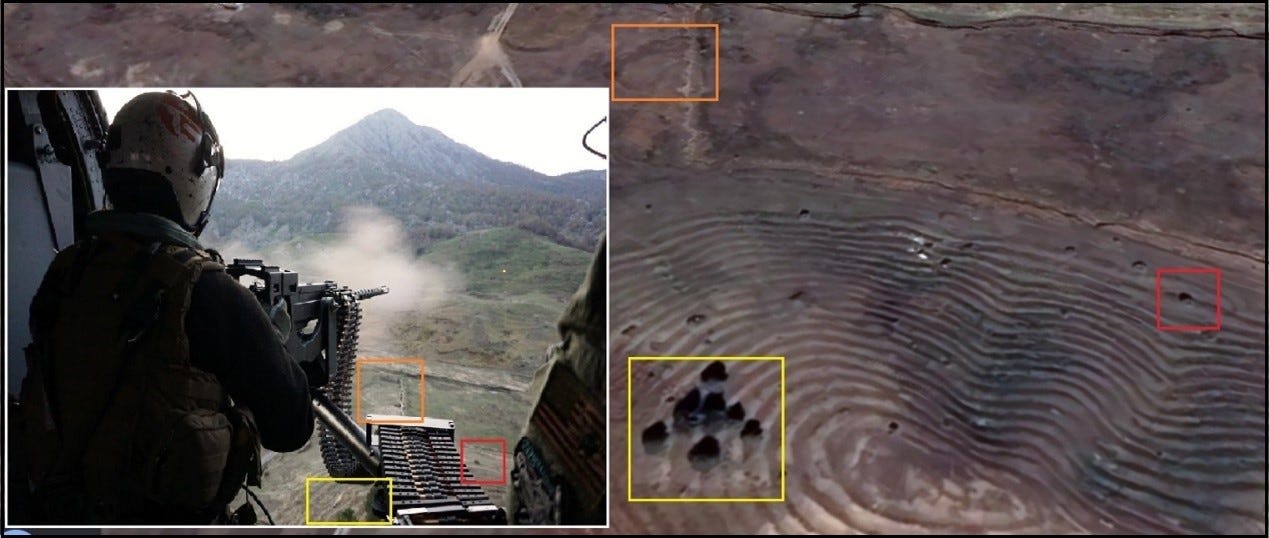
And in a close-up with the little details including what looks like a shrub or rock on the right, it looks exactly like the one in full fit.
And now to determine the location with maximum accuracy:
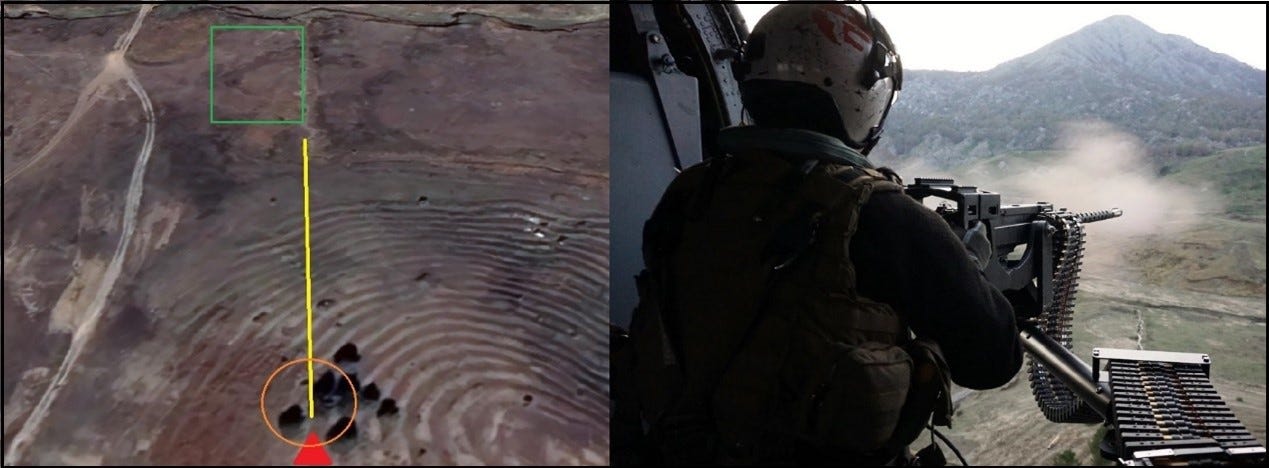
Now that we have a landmark, we will move to the Peak Visor platform and check the suitability of the topography.
Upon entering the platform at the link.
In the first stage we will move on to "Explore Mountains" mode:
Note that the platform is also available for download on mobile in the Android and iOS versions but is highly recommended to work with the desktop version.
And now a step-by-step explanation from the moment the platform opens:
The platform will load in a few seconds and will open itself, by default, in the Alps because it impressively represents the platform. We will now enter the waypoints we collected during the analysis, in the place designated for them as described above.
(1) is where we enter the waypoints (in our case: 41.3436546,20.1859187).
On the left (2) we can see the general area in which we aim the waypoints.
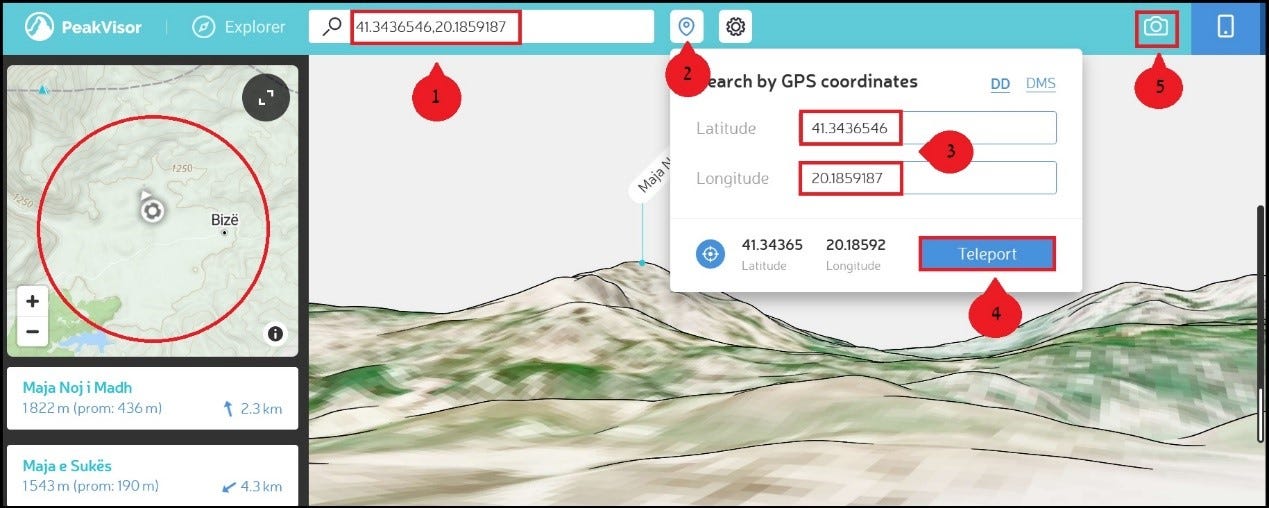
There are 2 ways to enter waypoints when the recommended one is in location (1), a second option is mainly used for manual entry for corrections so that the platform does not reload every time (2). If we have selected manual entry we will need to click on Teleport (4), the last step after entering the waypoints is to upload the required image for analysis (5). In any case, the topographic surface has already been loaded and the area can be seen in the panel on the left.
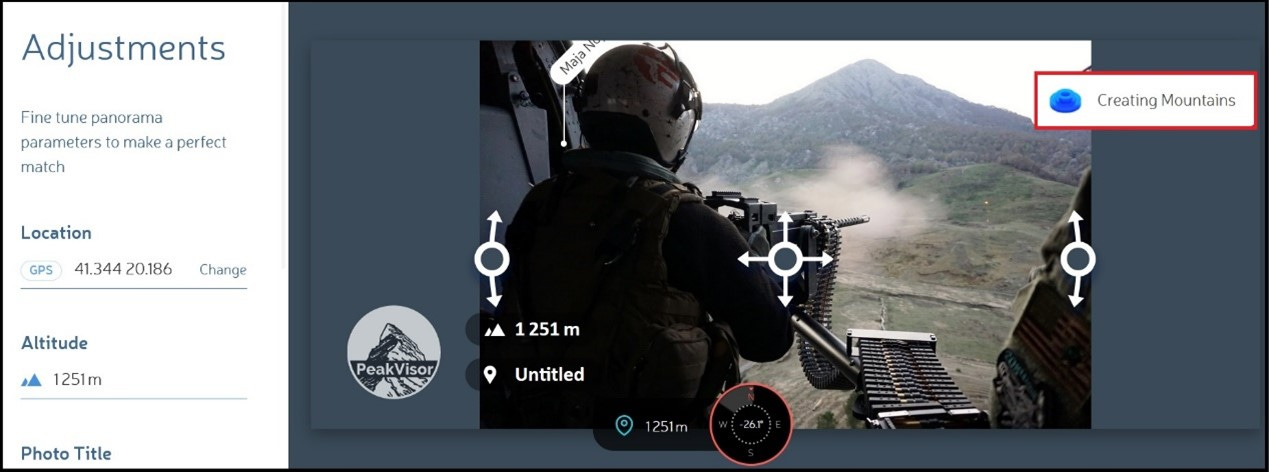
After uploading the image, the platform will calculate the topographic surface, a process that will take a few seconds. This indicates that in case the surface is cluttered, and the platform gets stuck it is highly advisable to open a new pane.
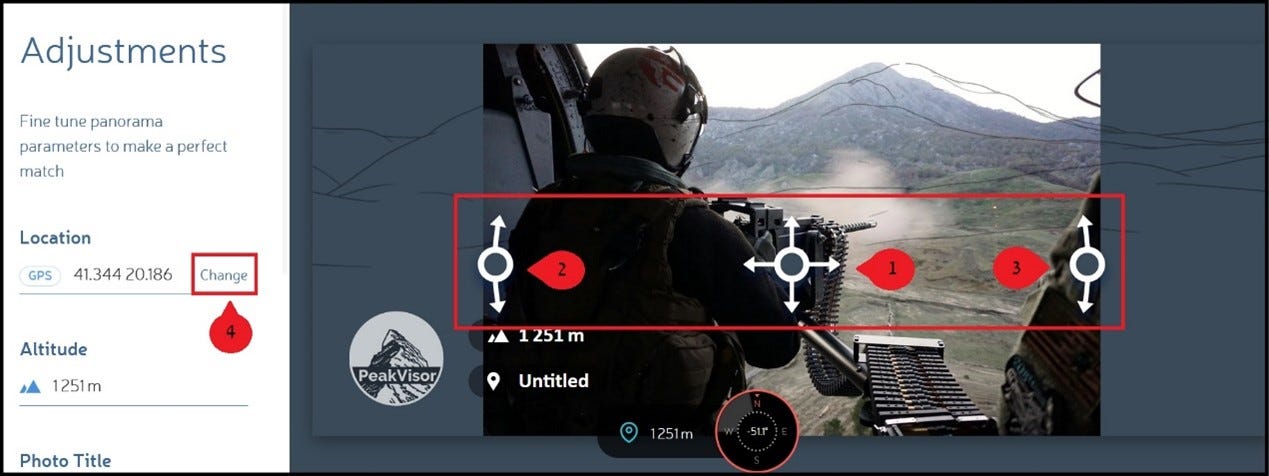
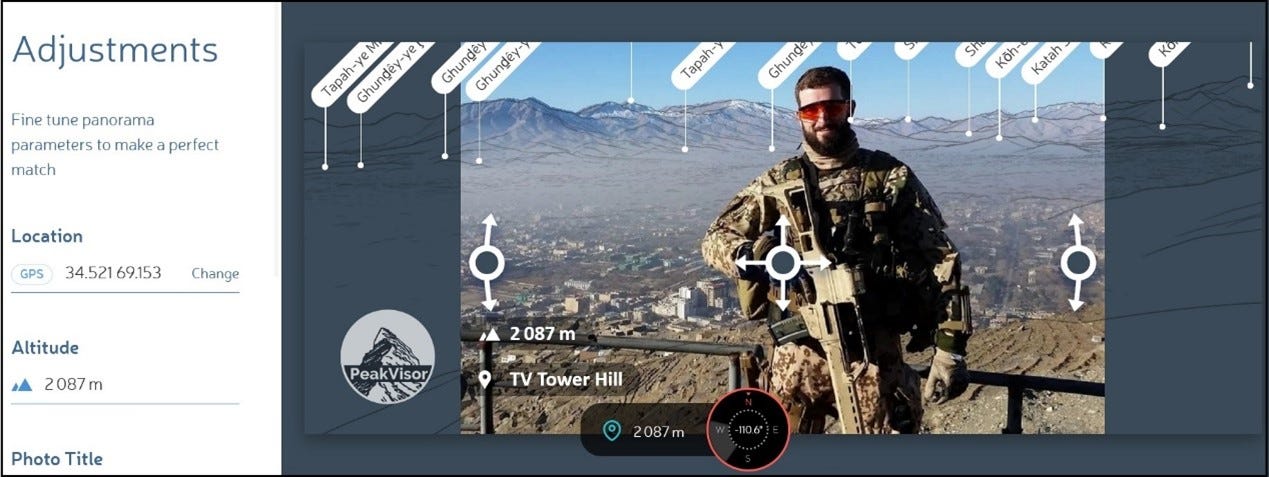
Once charging is complete, we will begin to stabilize the surface until it is fully aligned with the landscape in the image. To do this we will use the three rudders of the interface until adjusted. Rudders 2 and 3 are used to stabilize the surface up and down respectively, and the main steering wheel (1) through which we adjust the topographic interface until it matches with the surface in the image. There are 2 ways to do this, the first: Right or left navigation with the left click of the mouse on the steering wheel (1) and the second is for more professionals, pulling the steering wheel (1) with the left click of the mouse without release, the surface will stabilize itself (less recommended because precise control is required in the interface). There is another option (4) to change the waypoints in order not to reset the position.
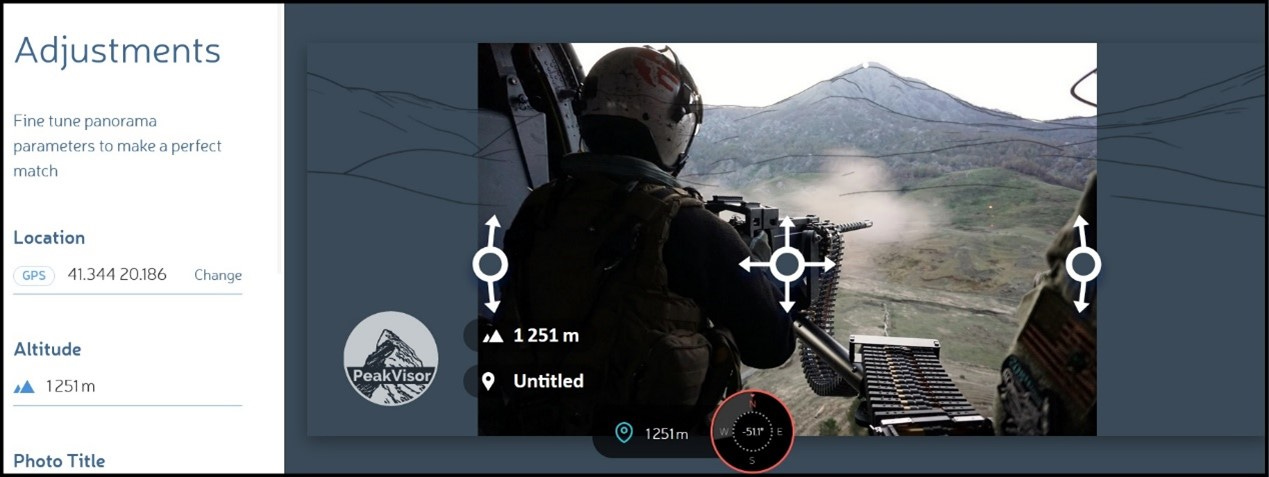
Play with the steering wheel interface until the result is as accurate as possible. It should be considered that the more accurate the waypoints are, the more we will get an accurate position of the mountains on the platform, and of course, the shooting angle will also be considered. Now another example, the picture from the evening training:
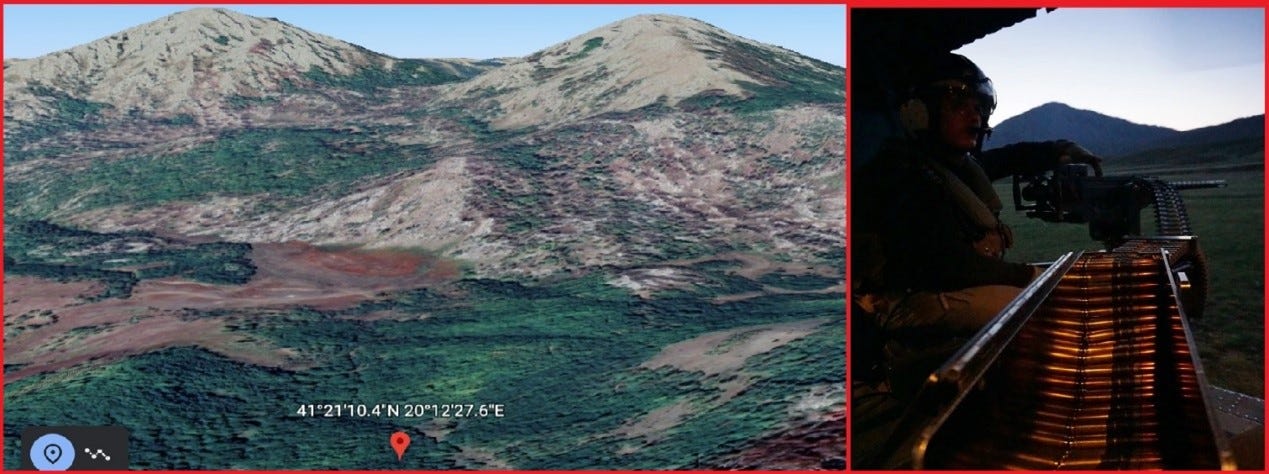
I will save the process of finding the location because this is not the purpose of the guide and you already know how to get around the map and assume that the waypoints are: 41.3529006,20.2076573, we will enter them on the Peak Visor platform respectively.
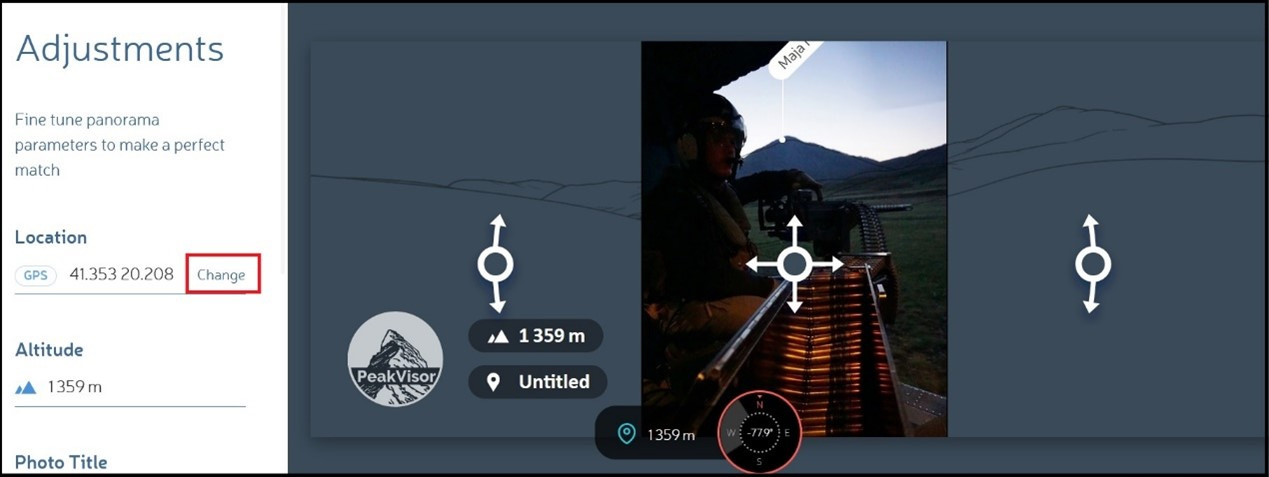
You can change the waypoints in the space provided on the left, I recommend reloading them to avoid bugs and make it easier to load the new one that might get stuck (from my experience).
Now let's move on to the third picture in the article, for me this was the most challenging of the three:

The challenge is the wide-open space. The data in front of us is a mountain range, several hills with a special terrain route, and several rocks, yes you read that right, rocks.
On this occasion, I will repeat one of the most important tips in the Geolocating process, which I remind myself in every image analysis, in Geolocation one must think outside the box and not be based on visibility, at least not in this case. Whoever adopts this tip will save himself valuable time (can even reach several hours), one of the tips is “written in blood” as they say. The mountain range is not a problem to find on a map, but what about the terrain? On the surface, it is a lawn area. It should be considered that Google Earth is based on a relatively old satellite mapping and sometimes this thinking is inhibiting. From this point of view, it is not possible to distinguish a lawn area, but it is possible to distinguish a landing area for helicopters. And based on the 2 prominent rocks and the special topographic line below, we can find a match.
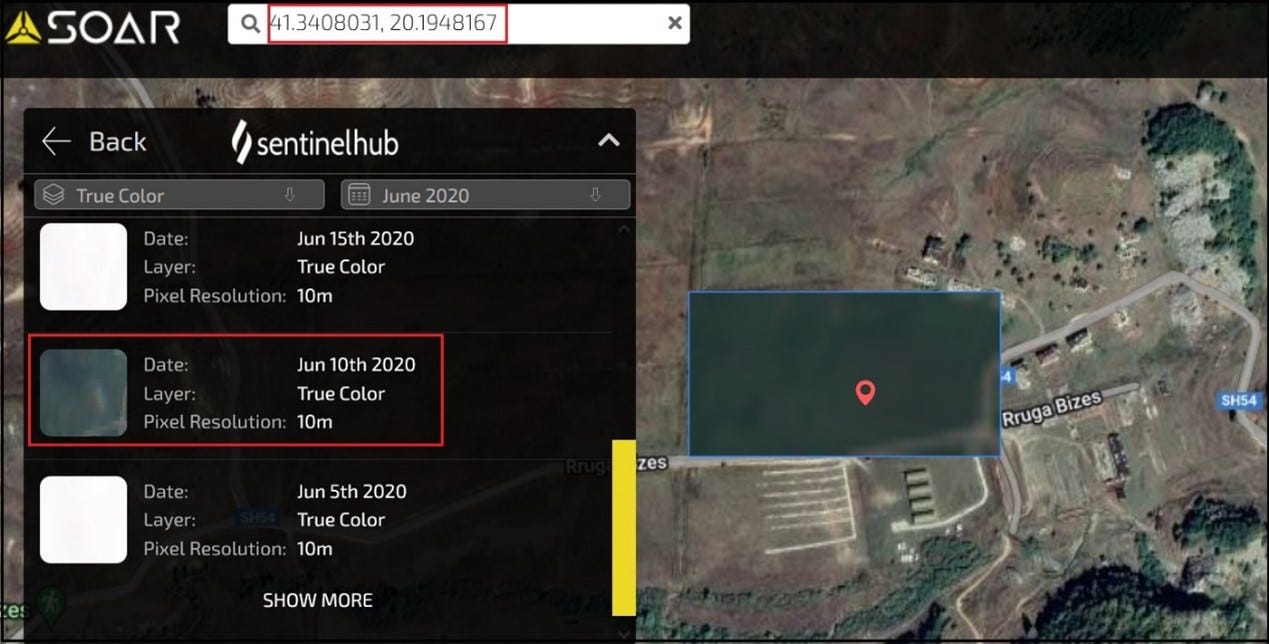
Although the helicopter in the picture is not parked in the place marked on the map, I relied more on the location of the protruding rocks. It is highly recommended to always check the surface with satellite platforms, Sentinel 2EO or SOAR, as this guide was written a year ago I used the SOAR, I took a close date to April 2019 with the best Sat. view and just checked the surface at that point of Geolocation for a lawn area:
And now for the final stage of position verification, since the helicopter is not parked on the landing pad, we will enter the waypoints (41.3408031,20.1948167) on the Peak Visor platform:
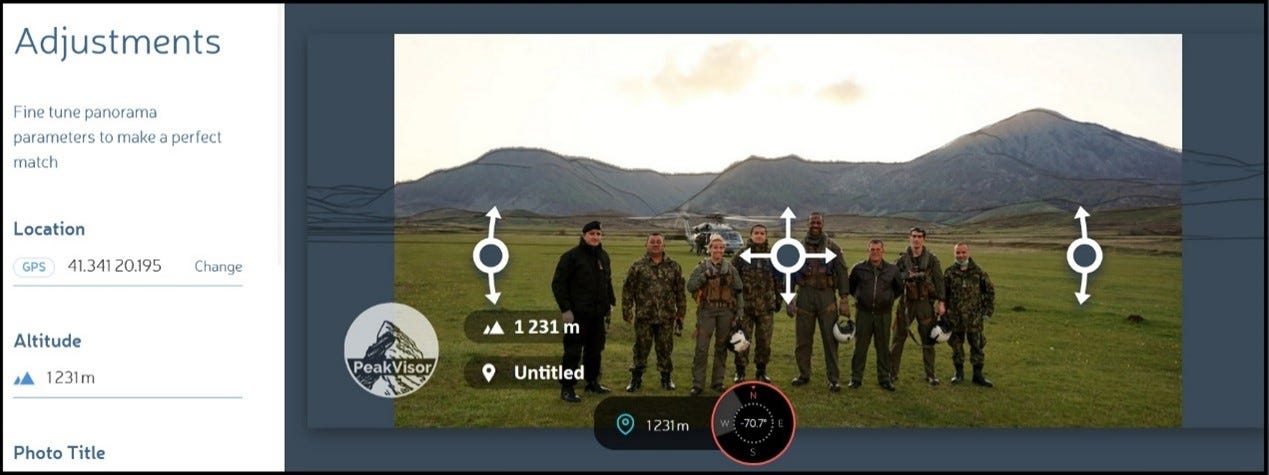
A complete match between the landscape in the image and the surface lines on the platform can be discerned, confirming the geolocation work.
Kobo, Ethiopia- Case Study
We will now move on to another challenging case study, as it is a matter of finding a location in an open area with great difficulty in clinging to any points, but certainly not impossible:
The link to the article source is here.
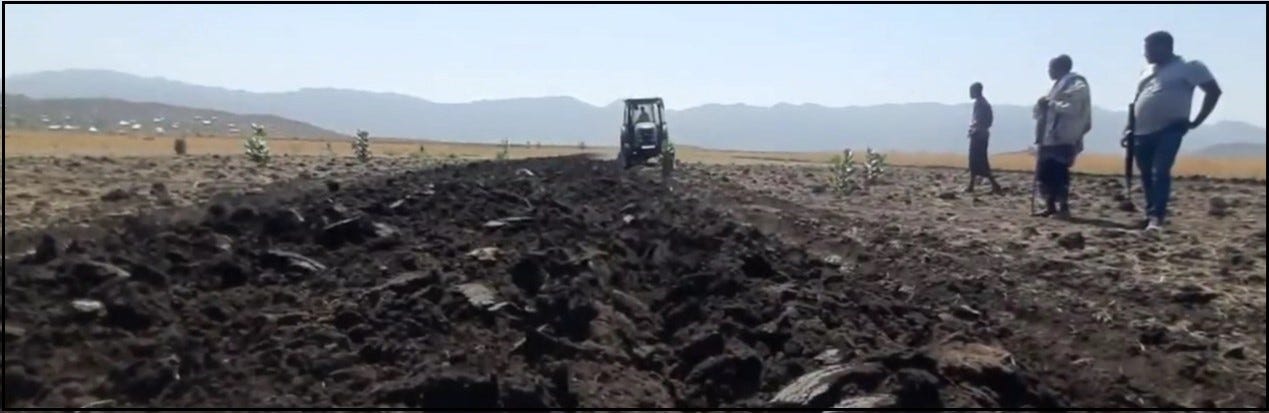
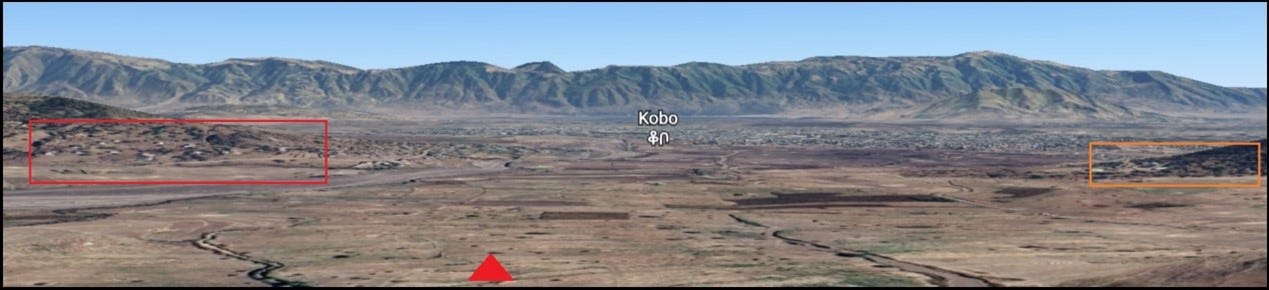
The content of the article indicates the contribution of a tractor to the farming community in the town of Kobo located in northern Ethiopia, in the Asmara district. So, let's see how it looks on the map:

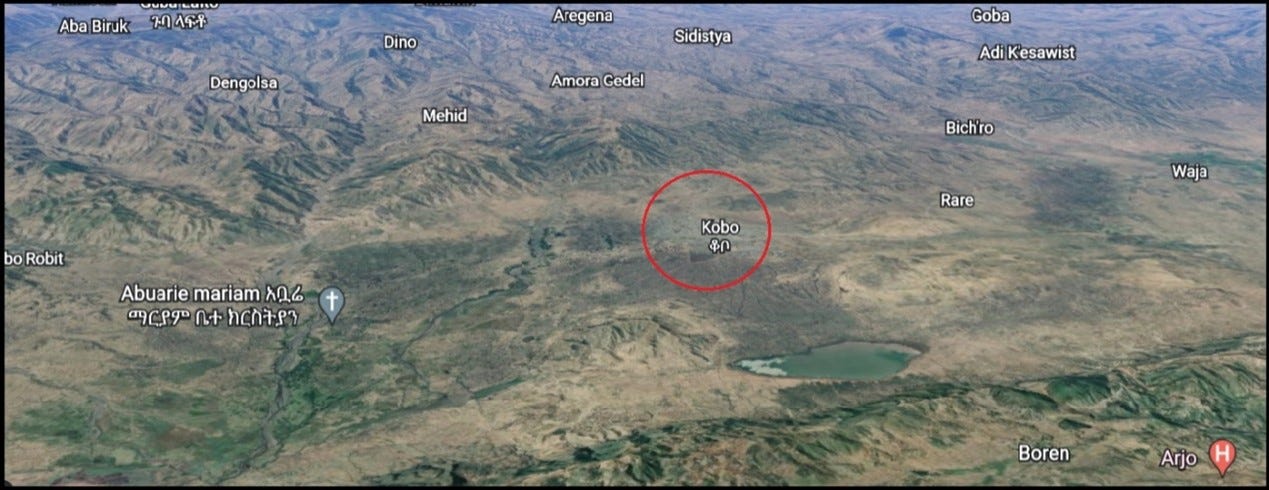
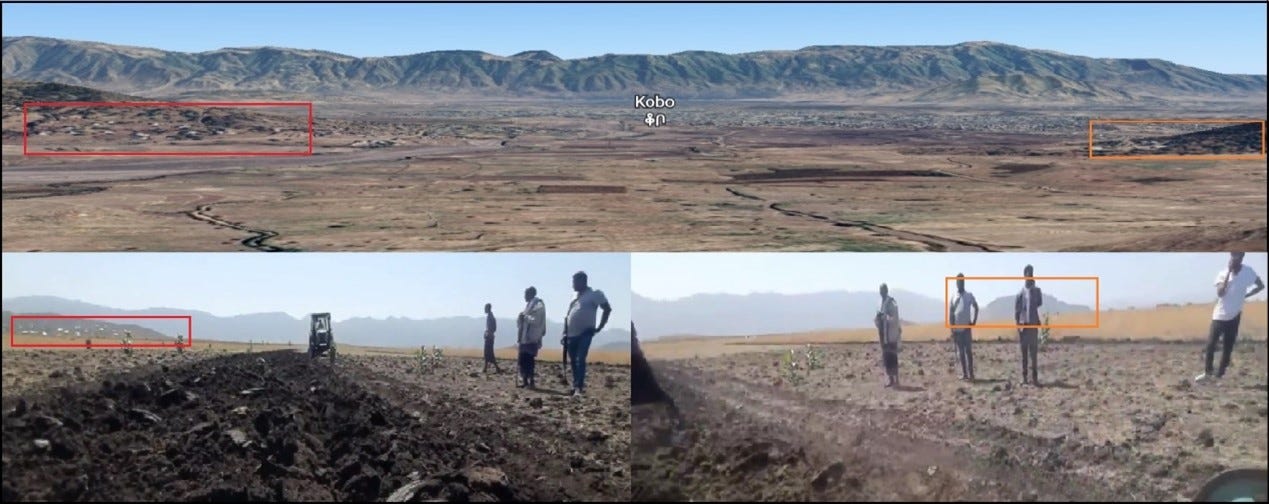
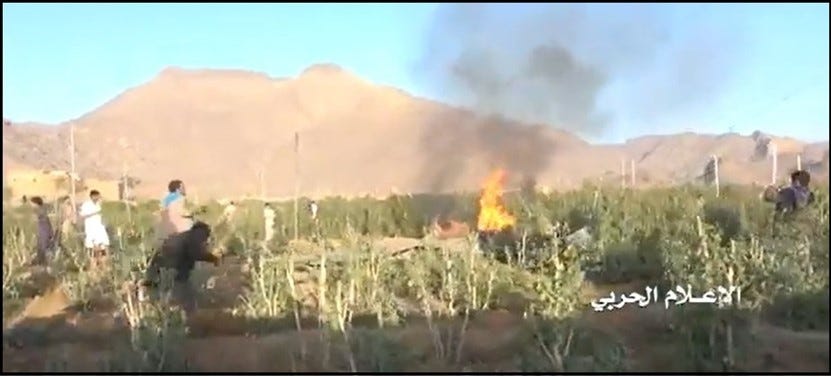
If we go out of the town's close-up, we can notice that it is indeed surrounded by mountain ranges around it. So where do we start? The first thing that caught my eye in the original video, was an urban area on one of the mountains to the left of the tractor in the farm field.

Watching the video, a hill to the right of the tractor in the farm field also stood out, and what looked like scorching in the ground:
Based on the mountainous horizon, we will look for an initial match on the map:
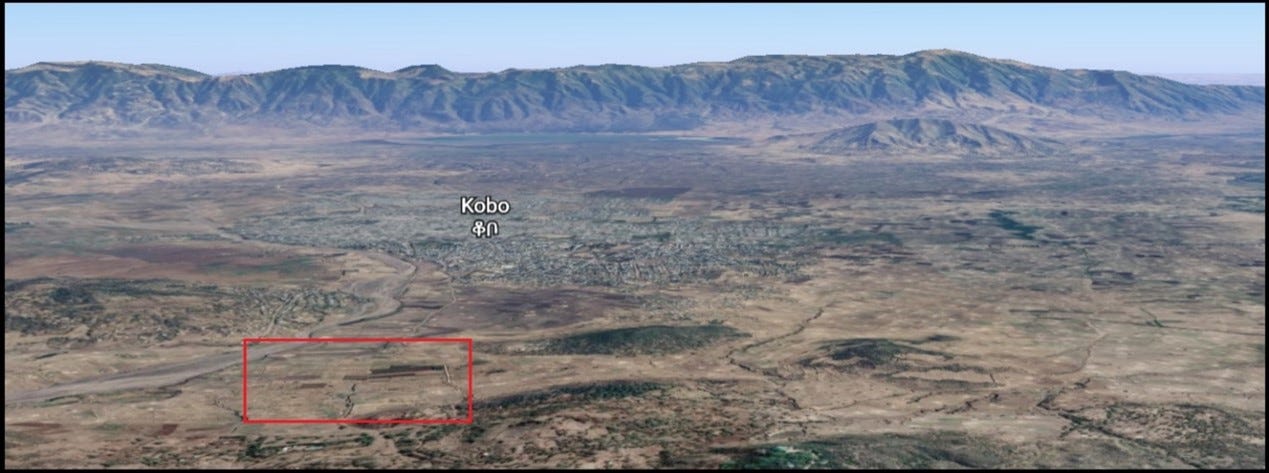
I focused on the farm area which is west of the town of Kobo and in close up, you can see a mountain on the left with the urban area (surrounded by a red rectangle) and a hill on the right:
In detail it will look like this:
And for the latest analysis:
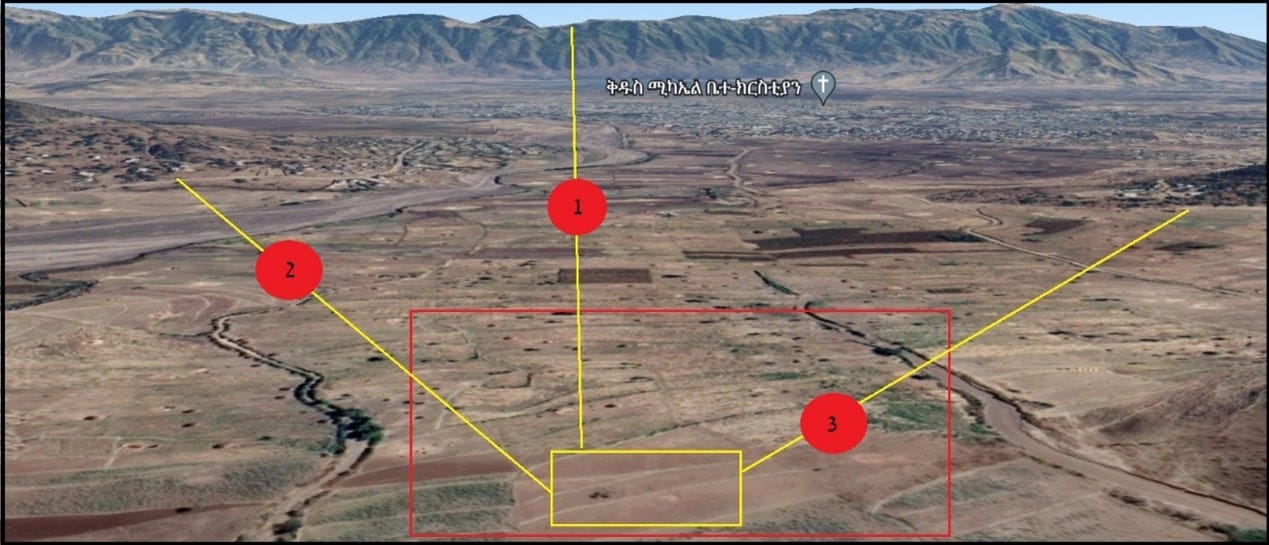
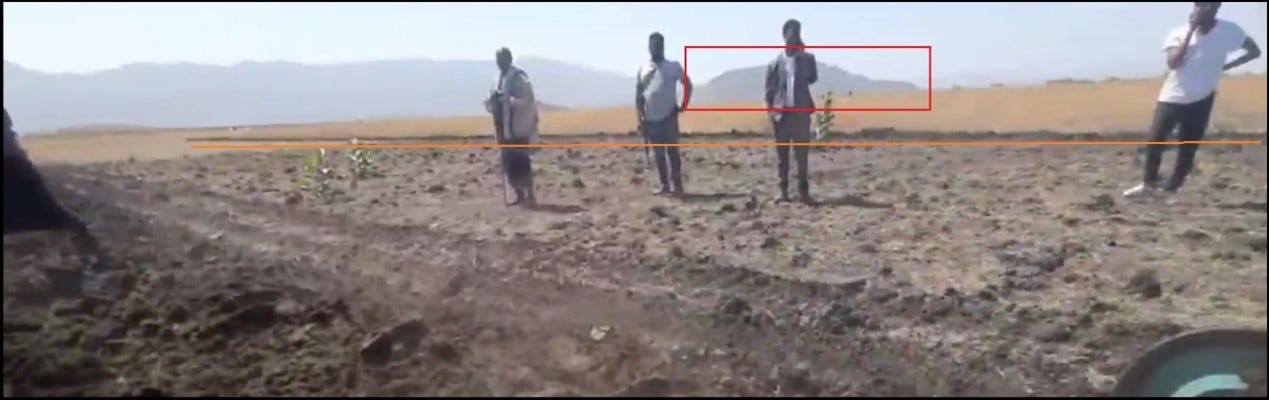
I focused on searches in the red square area when I refer to several looks.
Position of the tractor relative to the mountain range (1)
Location of the photographer relative to the left mountain with the urban area (2)
The position of the POI (Person of Interest) (The guy with the suit) relative to the hill on the right (3) and then I focused on the yellow square).
I also considered the prominent scorched earth on the right and after several attempts, I was locked on Geolocation 12.1518137,39.6000926
While checking in the Peak Visor platform it looks like this:
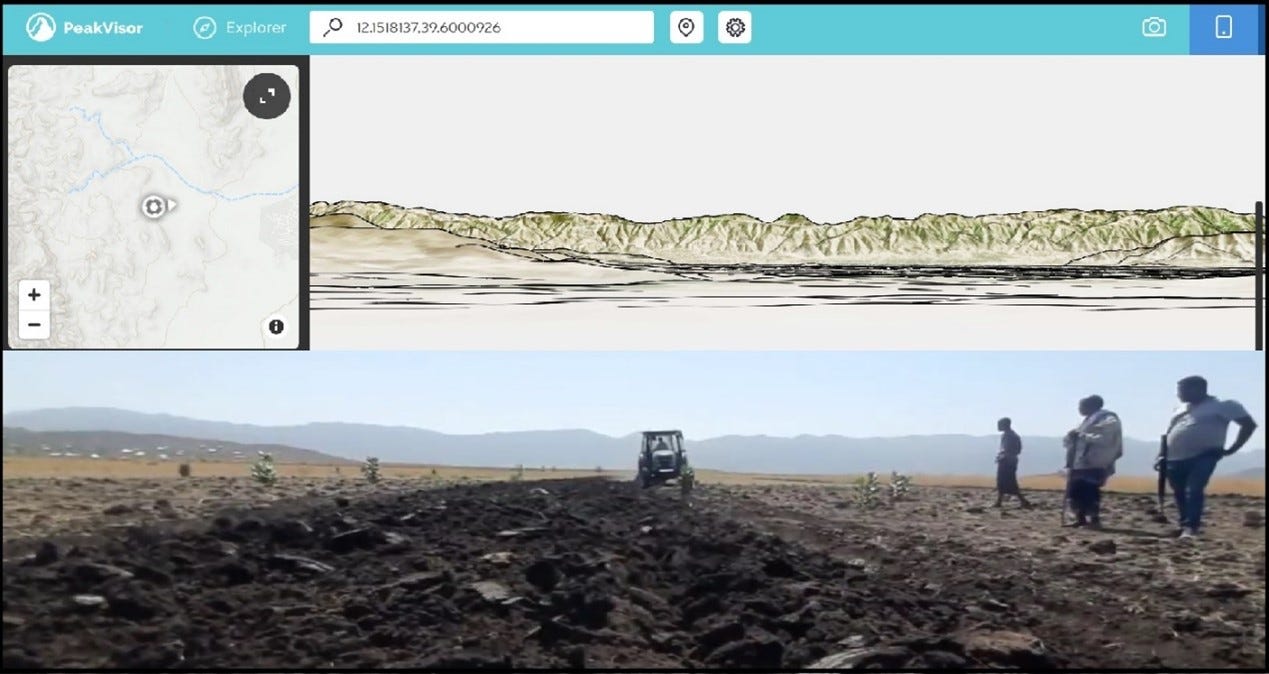
And in full compliance with the surface:
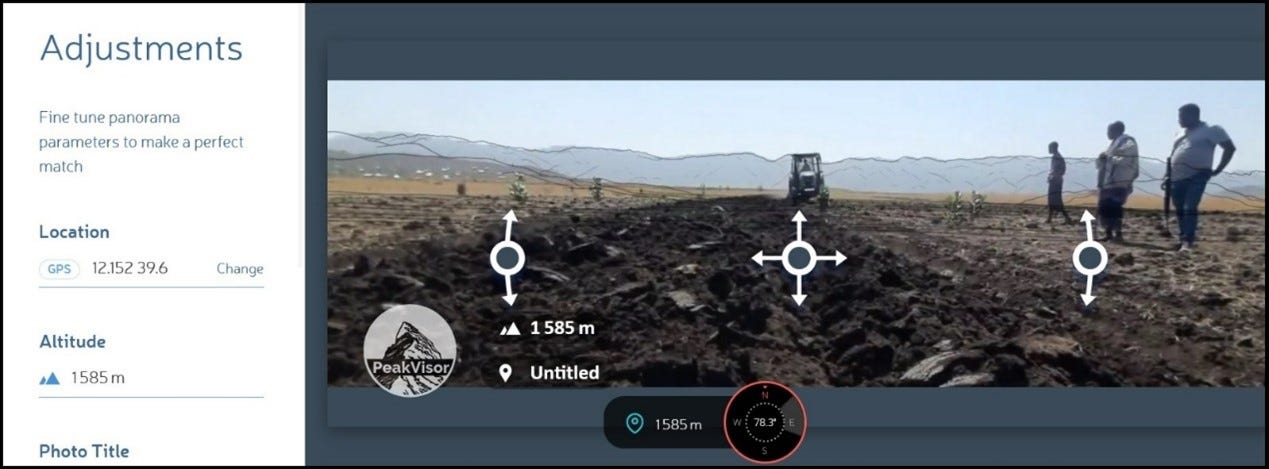
There is a deviation of 2-3 meters, not critical to the case since it is not an injury.
The location of the coordinates in an open area is a challenge based on a minimum of data in the field.
Beyond that, it takes a lot of patience to play with the points to the nearest location and of course free time.
We'll move on to another case for practice.
Wing-Loong drone downed by Houthi in Saada, Yemen- Case Study
Here is another case, also categorized as one of the most challenging cases and with a higher level of difficulty than the ones I mentioned before, as it involves finding a location in an open area with great difficulty in clinging to any points, but certainly not impossible.
The source link to the case video is here.
The video was uploaded to YouTube on April 20, 2019, and states that the Houthi forces intercepted a Wing-Loong drone made in China, over Saada province in northern Yemen on April 19, 2019. I was looking for more information about the incident but could not find anything on the Twitter platform because the account was suspended. That is the reason that encountering important videos for analysis and research must be downloaded directly to computer folders before the publisher account is suspended or even deleted the evidence.
From the information we have, this is a downing of a drone by the Houthi forces in Saada province located in northern Yemen.
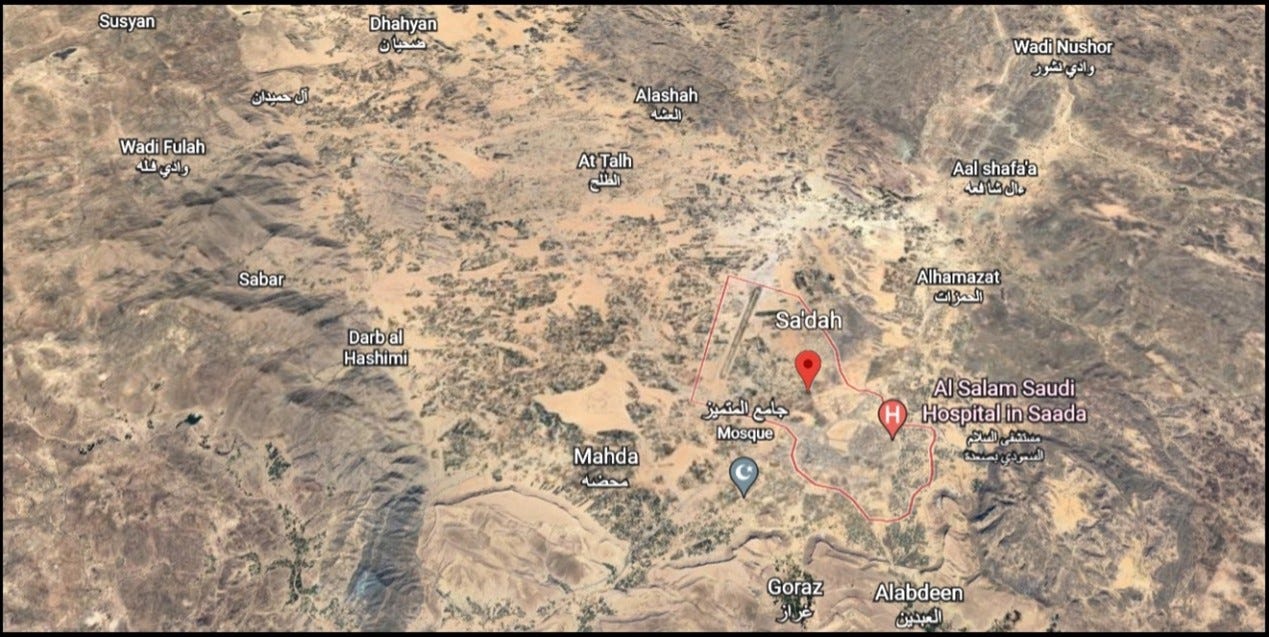
In searching for a Saada entry, I came to a top-down view of the county. This is a desert area surrounded by mountains. It's time to start collecting findings:
Although the quality of the photography is not at its best, I still managed to gather findings that can lead me to the location. The drone fell in an agricultural area near a mountain range. The agricultural field is divided into rows, and a prominent hill can be seen to its left. (Because the scan took hours), I focused on the western area of the city because the mountainous terrain is more suitable:
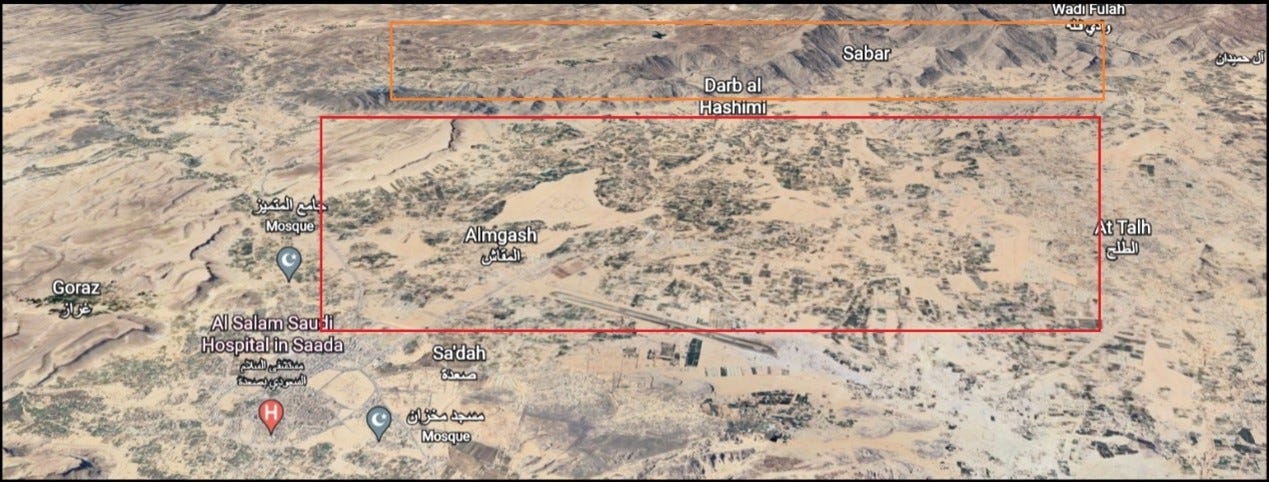
The red square is characterized by many agricultural fields with a mountain range next to it (surrounded by the orange square) that matches the one in the video and that is where I ended up focusing my searches.
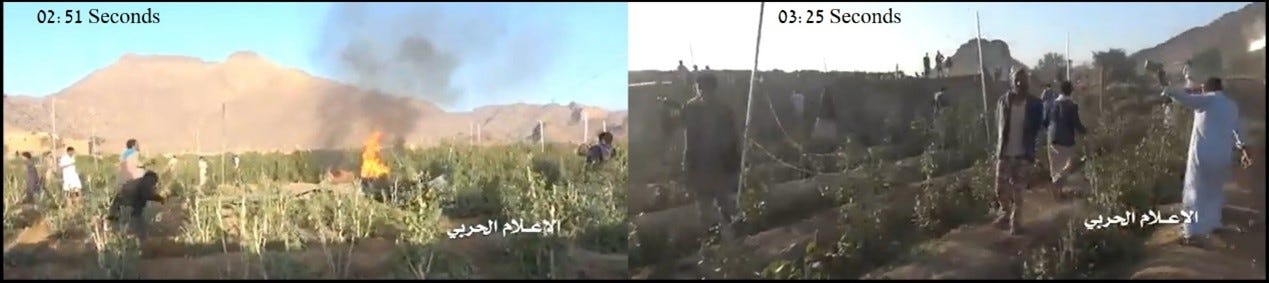
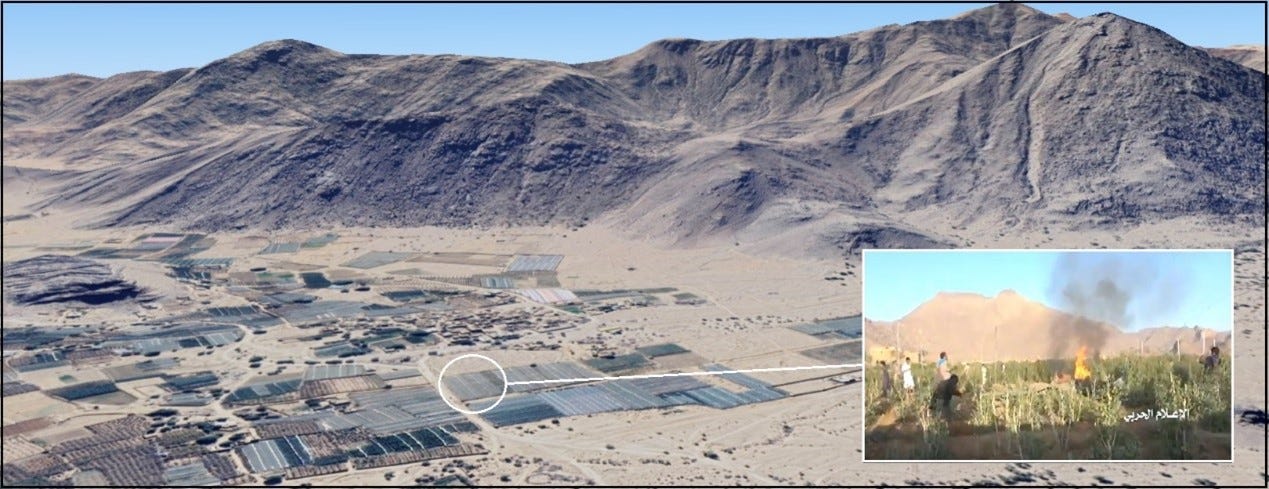
From watching the video, I was able to collect another object that could help in finding the location:

Several buildings are adjacent to the field as seen in the photograph (surrounded by the orange square) and their location is relative to the individual hill.
While collecting enough data, I focused on the agricultural field seen in the following photo:
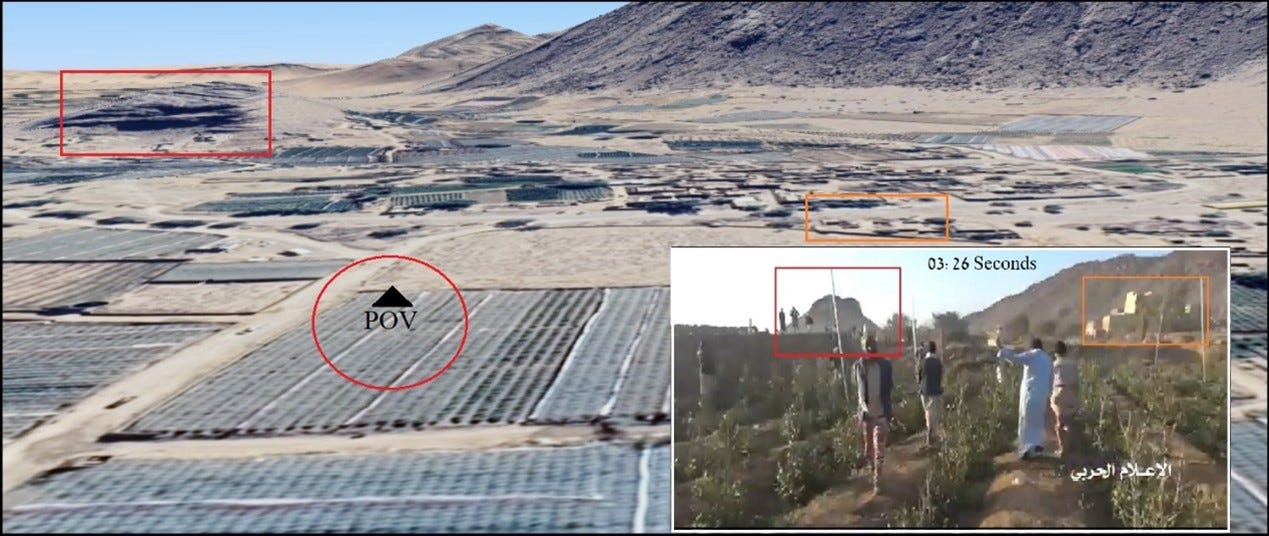
By the way, for those who are unfamiliar, the abbreviation POV means Point of View, a concept commonly used by analysts in the field of geolocation and refers to the point from which the video or image was taken.
Let's look again at the route of the agricultural field, in the best resolution from the video:
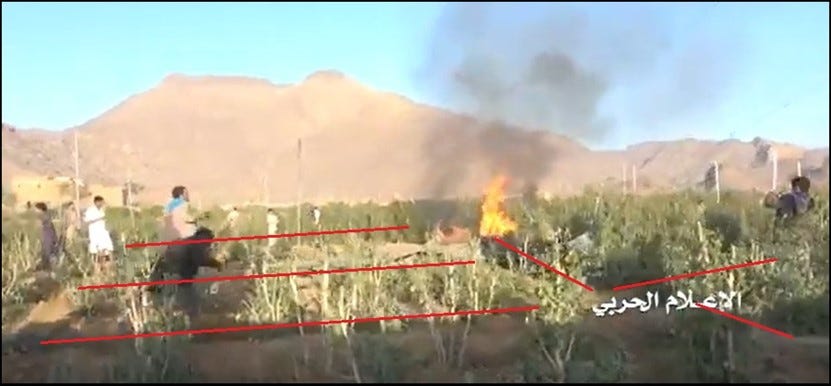
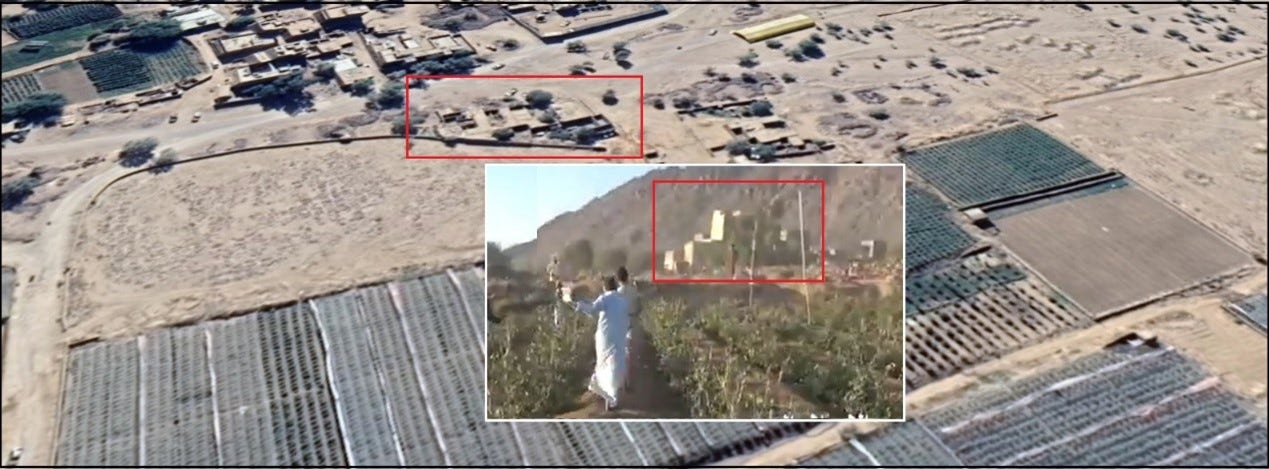
Now we will geolocate the co-ordinates: Geolocation 16.9870478,43.621198

And of course, we will move to the Peak Visor platform to verify the location:
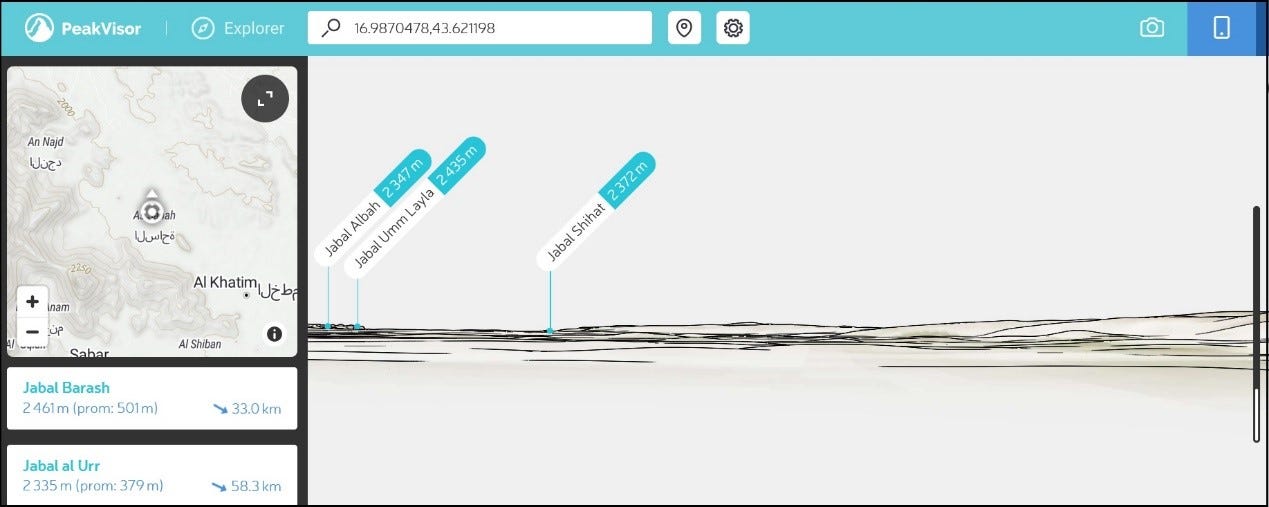
After entering the landmarks in the designated place and after loading the topography, we can understand on the small map on the left, the location of the camera. We know that the mountain range near the agricultural field is west of Saada so we will aim west by scrolling the mountain range according to the topography in the image.
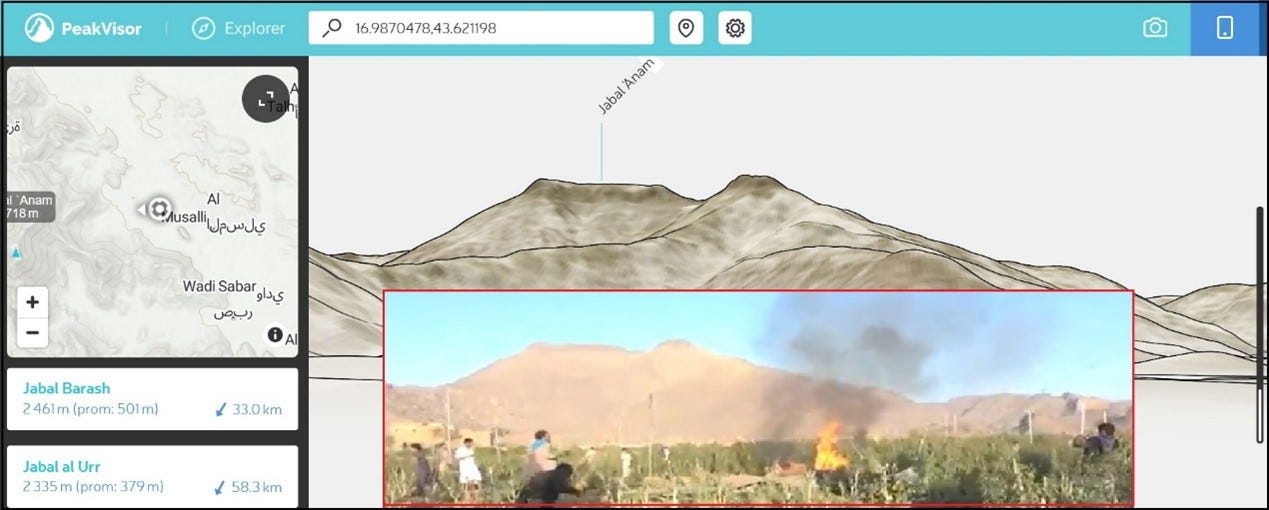
And what's left now is to upload the image to the platform:

This is a long process and sometimes can be tedious and exhausting, but one picture is worth millions!
And if that's not enough then we'll move on to the last Case Study, how is it possible without Marco?
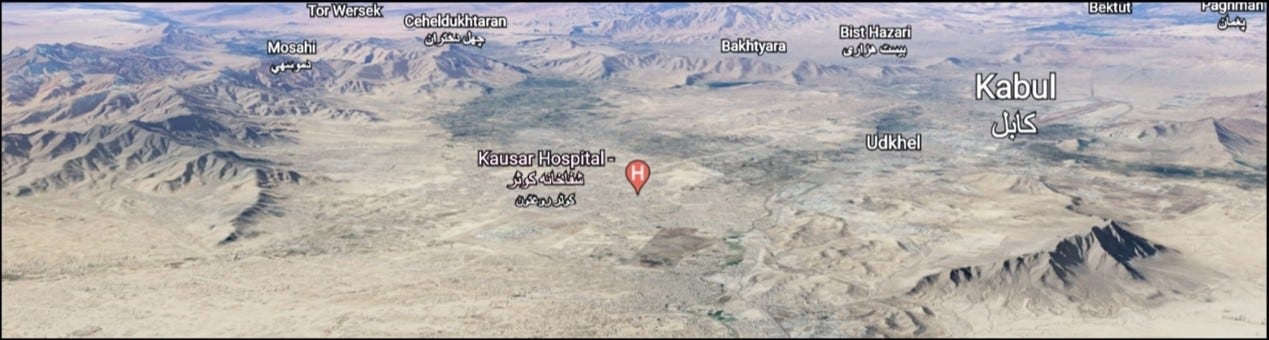
Marco In Kabul 2018 - Case Study

The following case was taken in Afghanistan. This case study required valuable time in the search since it is mostly a mountainous area, but there is no doubt one of the most challenging cases I have analyzed.
The Link to the article source is here.
From the text, we understand that the picture was taken in the background of the city of Kabul, the capital of Afghanistan.

And if we focus on the close-up of Kabul, it will look like this:
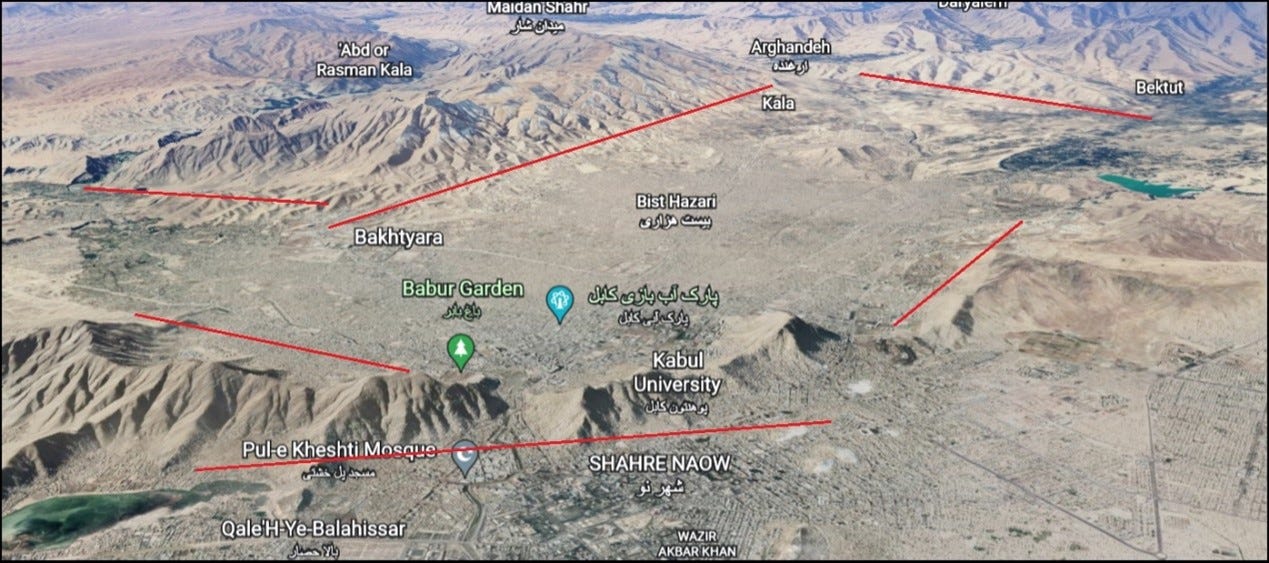
I marked the mountain ranges so I could focus on more comfortable work by division into regions. In practice, the search takes a long time, for the guide I will save that time.
I marked the topography of the mountain range. This will make it easier to search the map. Save the search time, the mountain range was located west of central Kabul.
And compared to the topography on the map:
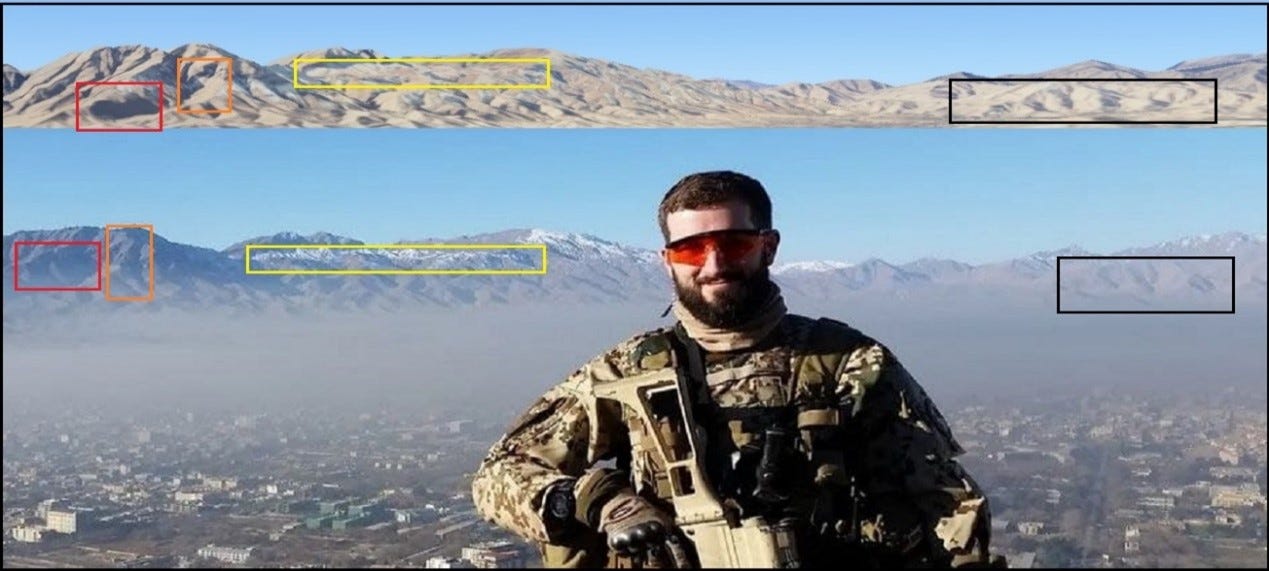
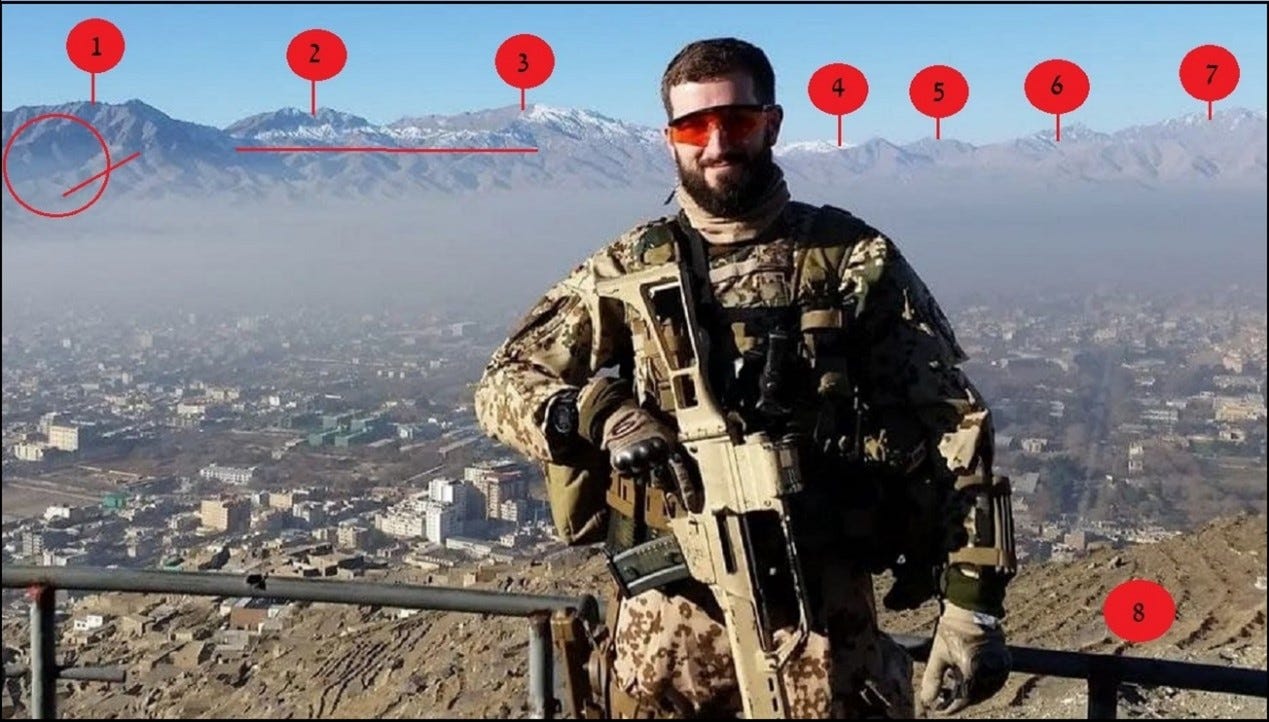
Notice the distant peak in the center of the mountain range, the top left mountain topography, the mountain trails, and the right top mountain top, there is no doubt that the shooting angle is one hundred percent appropriate.
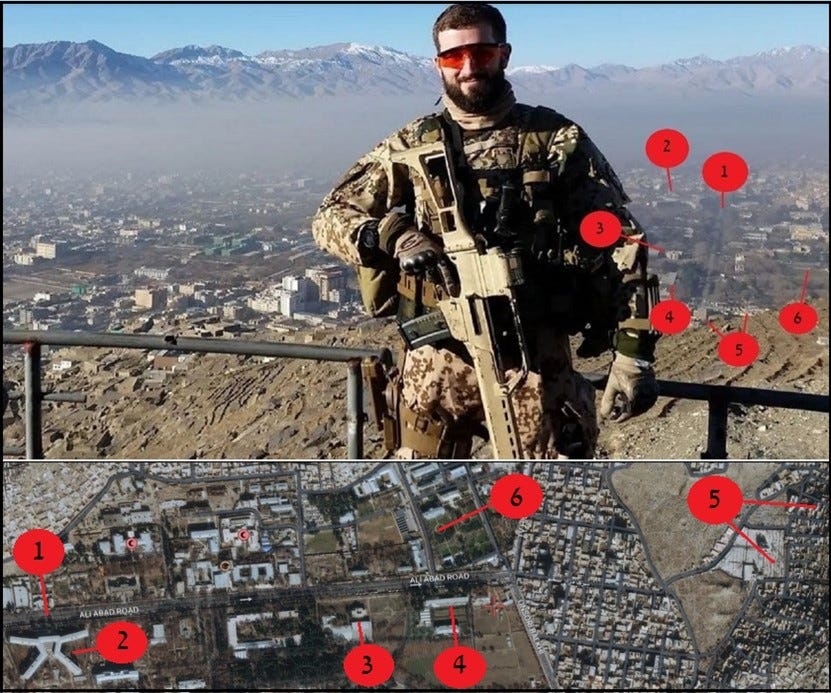
The main road for me was the cornerstone during the searches and matches, beyond that the road also gives an excellent indication of the location of Marco. Further adjustments of prominent structures, the special structure can be noticed towards the end of the road on the left side of the road. And the prominent structure at the end of the hill, with adjacent buildings of high density, is very characteristic of construction in Afghanistan on the slopes of the hills. Small compatibility check on the left side, identification of a mosque, and more structure and analysis of the location of objects and the main road:
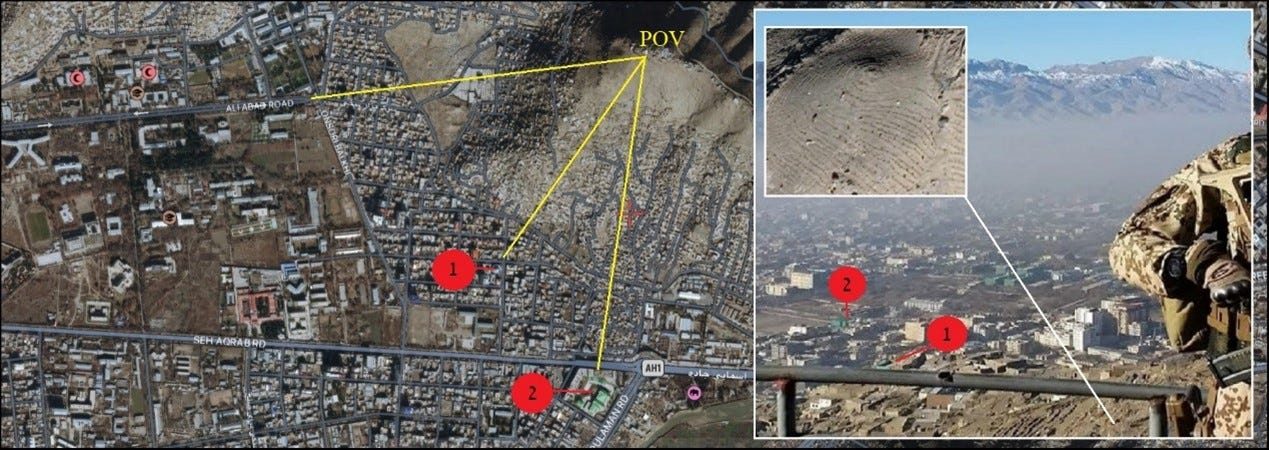
Geolocation: 34.5207095,69.1531213
We have now reached the final stage of testing in front of Peak Visor, we will enter the coordinates:
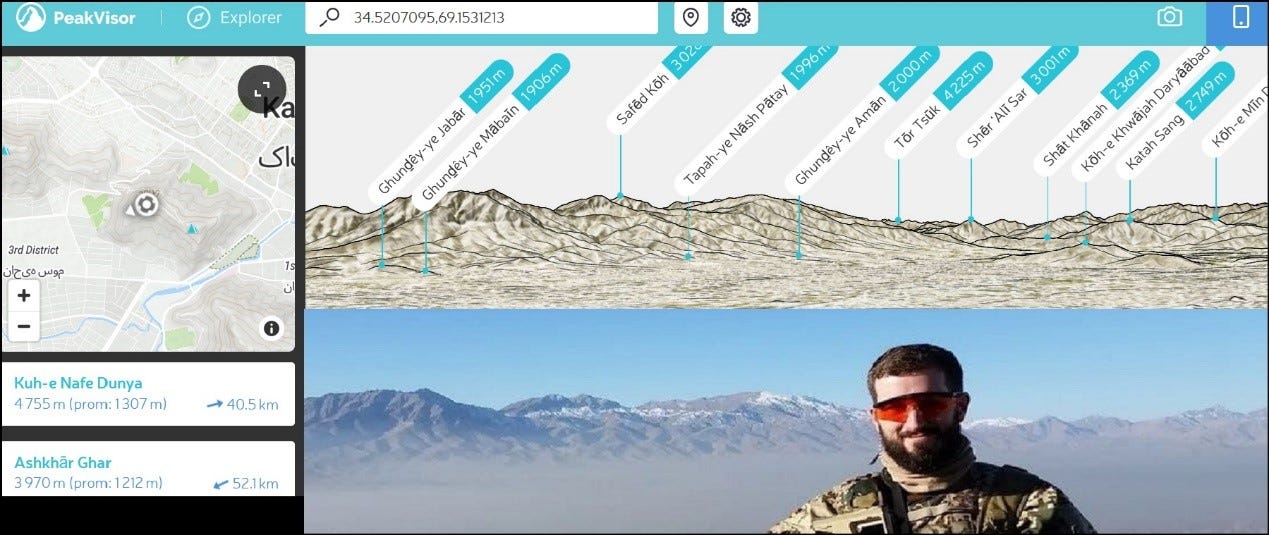
And after charging it will look like this in full compliance:
Afghanistan is an excellent and challenging area for geolocating practice in the method of mountainous topography.
Peakery
This is another web-based platform that is considered a mountain encyclopedia and unites a huge database of mountains and hills in the world. The platform is very popular among mountain climbers. The link is here.
The platform enables simple mountain search by countries and regions by entering a value in the space provided:

For example, I entered the Syria entry and after a short upload, the platform will load all the mountains and hills in the Syria reservoir on the map.
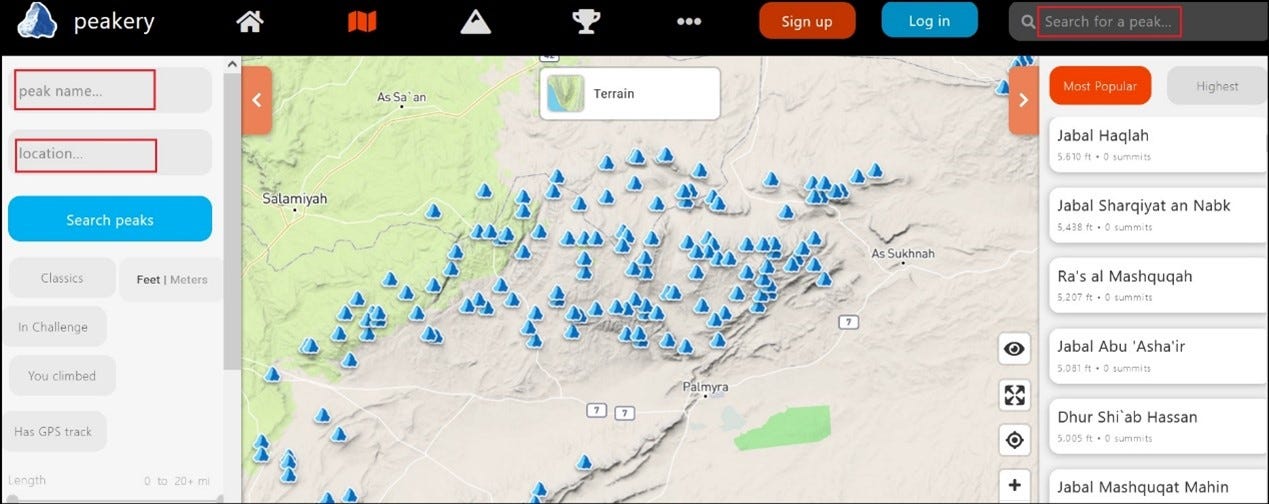
I marked in red squares the various search options available on the platform.
Search by name of the desired mountain, mountain range, or by location coordinates.
On the right is a list of mountains that appear on the map, each data contains an information database that includes altitude, number of peaks, mountain area, and other data as in the following example about the mountain Jabal Al Alali.

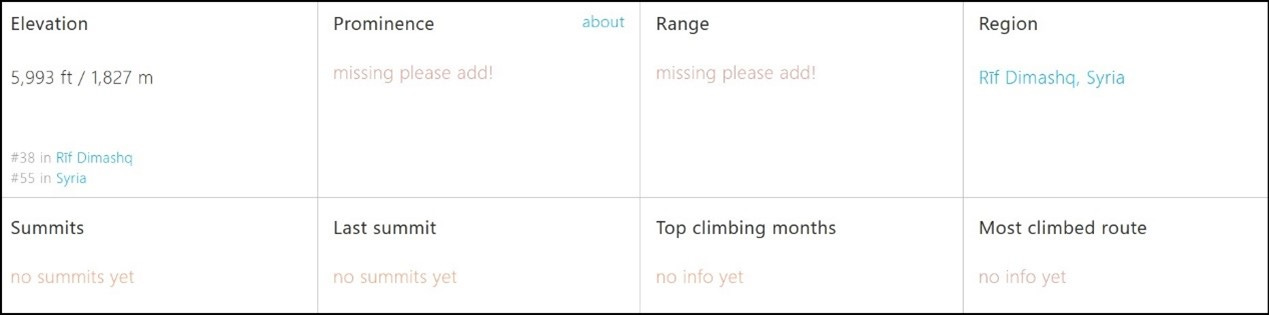
When you click on the link you come to a detailed topographic map of the mountain.
There is also an option to load different maps as we will see in the following image:
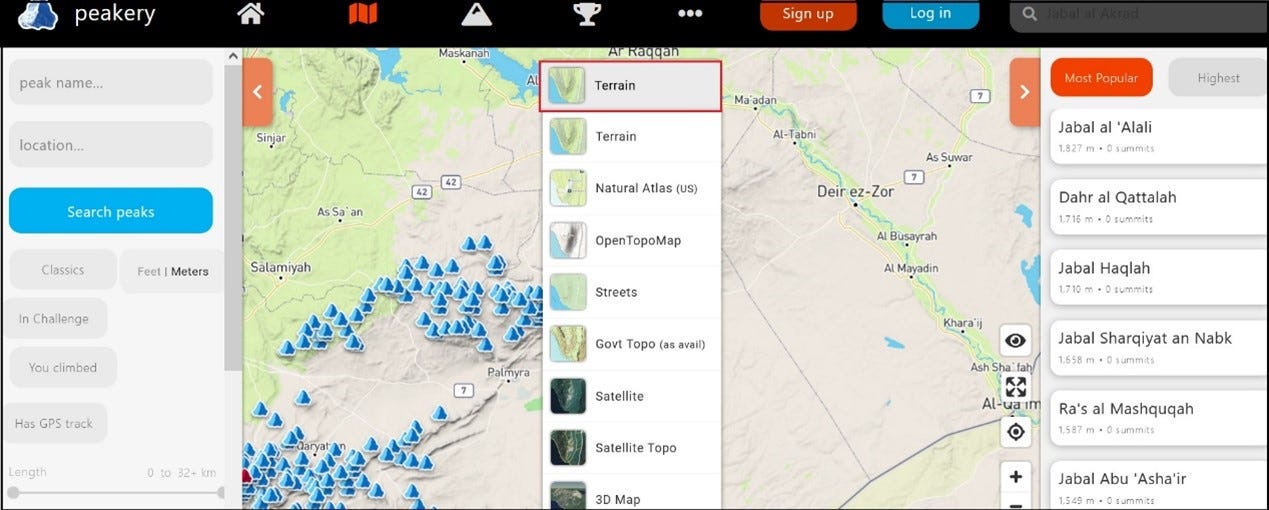
Google Earth includes a satellite map option and a 3D Map option.
Orientation in the 3D interface is done by left-clicking on the map and right-clicking on the mouse.
The downside to this platform is that the topography is unrealistic in many areas and lacks data in many countries.
Pros: The platform is a kind of encyclopedia of mountains and hills with different data and includes several types of maps.
Peak Finder
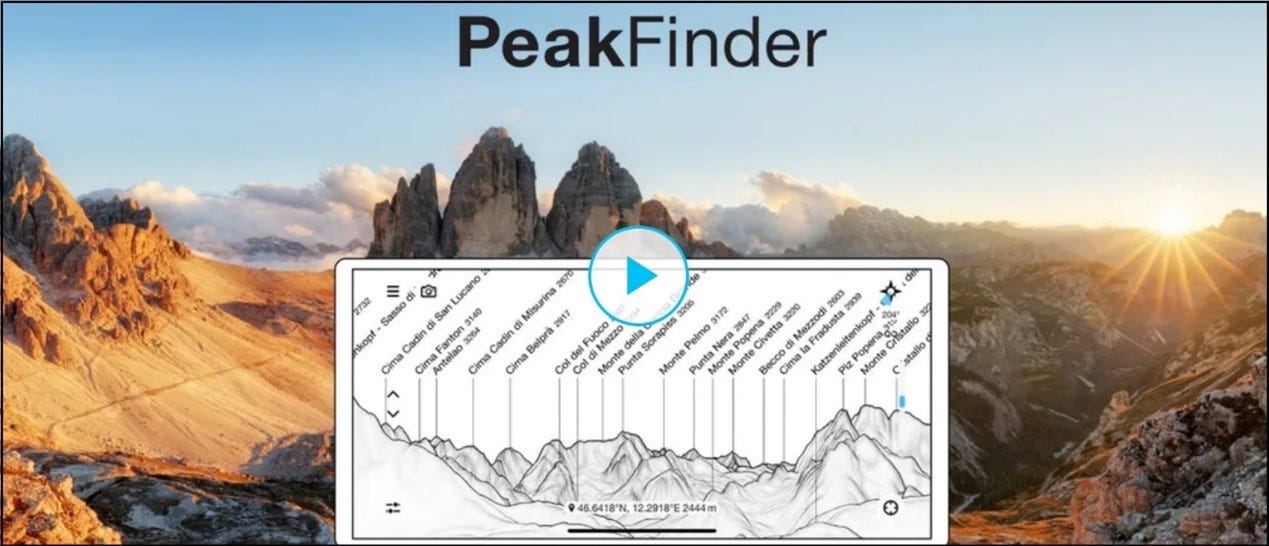
This is another web-based platform. This platform is also very popular among mountain climbers.
Available for download in various mobile versions.
Allows mountain identification by uploading a mountain landscape photo, assuming that the GPS and location data are active.
This platform is an accurate and likable orientation tool.
The platform's website explains in detail the usage procedure.
Image Notation & Markup Methods
A year ago, I was testing a new method of marking the matches in numbers, instead of the method of the squares / colored blocks of various kinds (Geolocating Colored Box Method).
As you saw in the last case, the adjustment of the surface to the images was not done in the form of squares or colored rectangles so as not to miss the mountain route, must emphasize every part of the mountain range, this will only help in the search. The second reason for the numerical marking method, the brain translates parts of an image differently. When you surround certain parts as a piece and in one color, the image will not be translated in the brain as much as several parts in the image when each is given emphasis and numbering, I do not know how many analysts will agree with me, but it is written from my experience only.
And of course, let's not forget the element of aesthetics, in this way, there will be no squares upon squares, the analysis is brought aesthetically counterclockwise, and this is of course one of the new methods, which comes toward the color-blind analysts, certainly not a simple method to digest, but it's a matter of habit.
There is no doubt that aesthetically it looks much better and solves the issue of color blindness for those who might read the reports and not understand what it is about. This method was first mentioned a year ago by Micah Hoffman one of the esteemed OSINT guys. Feel free to be impressed by an article on the subject at the following link.
Summary, opinion, and tips:
The Geolocation field is broad and contains many niches and tools.
Finding a location using mountainous topography is an art and requires a lot of practice. In the guide, I introduced several Case studies and explained how to use the Peak Visor tool, but these are just small tastings.
Sometimes the location will be found within half an hour to an hour and in some cases also lasted 3 months, it's all a matter of practice, training, and thinking outside the box and the element that I think is most important is knowing the area.
In my spare time I "travel" on the map mainly in the Middle East, Syria, Iraq, Iran, Yemen/Somalia, and along the Turkish border.
Only in this way, you should progress in this profession, the more terrain images are exposed, the more accurate and faster control of the area and in this way, the control over the affairs of Geopolitics will be broader.
For example, northern Syria is during a major conflict.
A year ago, Erdogan announced that he intends to implement a 30-kilometer-deep security strip inside Syrian territory. Turkish-controlled territory with signs of Iranian takeover and very strong opposition from Kurdish groups alongside jihadist groups on the other side. Displacement of forces, underground bunkers that suddenly appear mainly in northern Syria (I found at least 3 such bunkers during construction).
In one of my random searches, on the Turkish border with Syria, I came across this street:
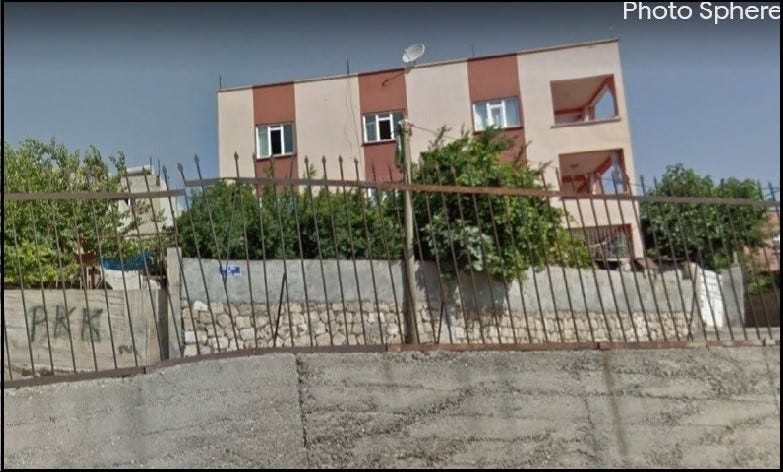
You can learn a lot about Geopolitics control from just graffiti on the wall even if Google Streets is updated for 2019, and this is not a picture from the internet but a real location on the map on Google Street!
Want to be a professional in the field? You should learn the classic methods of finding locations, neither artificial intelligence nor Python.
I've been in the GEOINT/Geopolitical Intelligence field since 2012, beginning in the Syrian civil war, I have never used any AI tool, when asked if there is AI-based software for finding locations, I answer: that pressing a button that finds this location may speed up processes and workload will be greater, but it will not make you professional in the field!
GeoGuessr
Another tip, sign up for the GeoGuessr website, a web-based gaming platform that combines lots of practice, knowledge, competition, and teamwork.
The main idea is to find random locations on the map based on visual analysis only and without the use of any search engines usually on a timed basis.
Over time you learn to characterize locations using vegetation, roof structure, the nature of roads, and so on.
A very challenging game, which is a guide in the geo world. Learn the map, daily practice and the sky is the limit!
The link to the game platform is here.
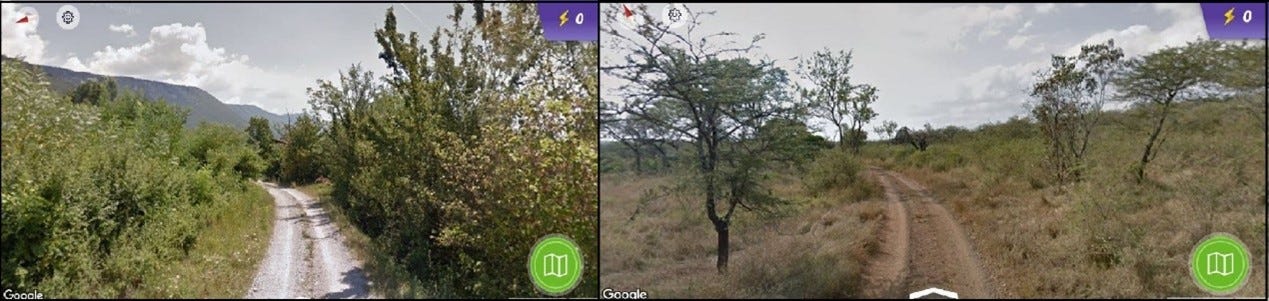
Available for different mobile versions. I think it's worth investing in a subscription, opens a lot of interesting options. And here's an example from last weekend, from a session I conducted with a group of addicts. The two paths are almost identical but from different areas.
Able to identify? I succeeded and everything according to the location of the sun, the route of the terrain, and the route of the road, on the right Eswanti in Africa and on the left Slovenia:
And one last tip that I think is no less important, you will learn from the Case studies of others.
My favorites are those of Benjamin Strick as an example of the following article.
Highly recommend watching his YouTube channel as well!
And another DFRLab article that I keep and can learn a lot from!
Recommended profiles on the Twitter network that you can learn a lot from in the field:
The Twitter network is full of geolocation analyzes and you can also find cases and entire studies known as Case Studies, the list is long, but I listed below the selections of my morning cup of coffee.
Benjamin Strick, Wim Zwijnenburg, Joshua Koontz, John Marquee, Samir, Sargon Courtenay, Micah Hoffman.
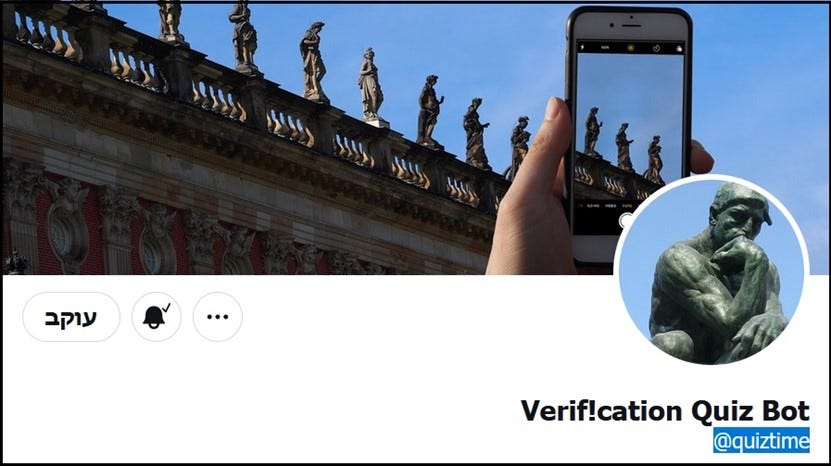
Verif!cation Quiz Bot In this profile you can experience professional challenges in the field of Geolocation, highly recommend it!
Remember the image?

So, these are 2 different locations, and I have yet to find their waypoints, probably challenges that will keep me busy shortly…
Next, you will find several challenges for your practice.
If you want to practice in Mountain Geolocating method, try the following challenges, feel free to post your findings as a comment on my post or send me a DM on LinkedIn/ email or just keep it to yourself.
Let's practice!
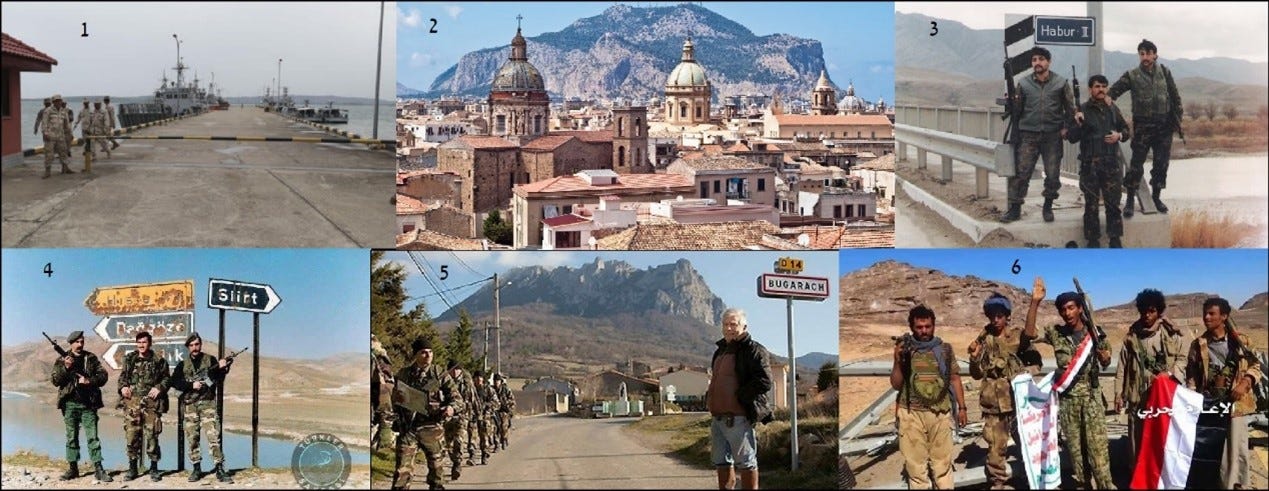
The following are the easy and medium levels of difficulty, from 1 to 6.
It is very important to always use the original image when uploading to the Peak Visor and not to use the image that I attached here.
If you don’t trust the links sources, you can always make a reverse search for the image and with Google Lens, you can get into the source website for details.
Note that I'm not responsible for any damage from the following links:
Image 1, Image 2, Image 3, Image 4, Image 5, Image 6
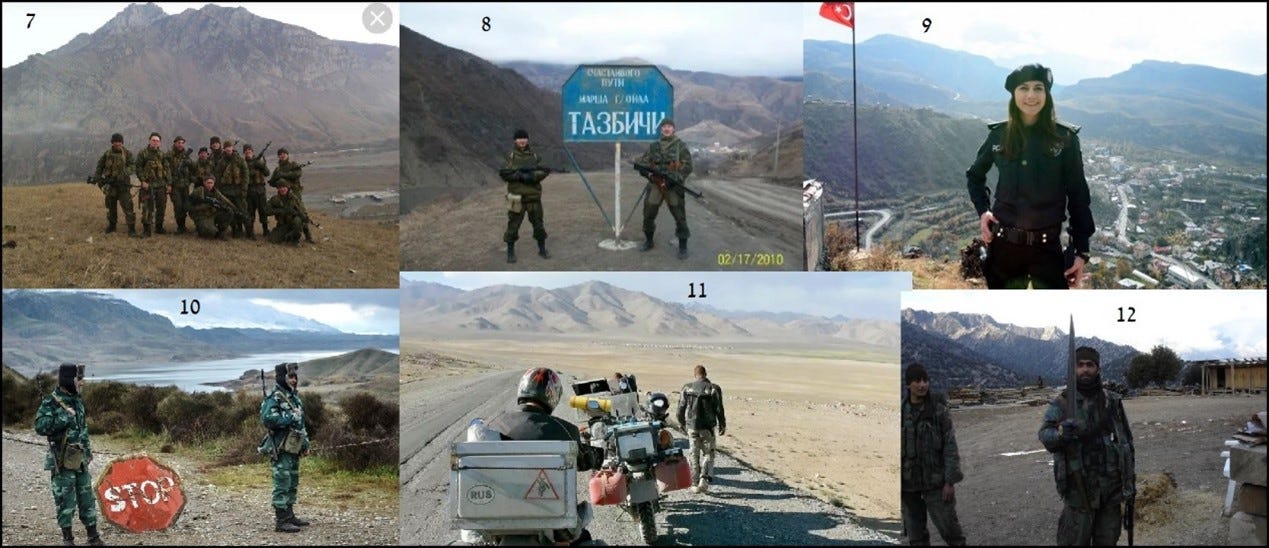
The following are the difficulty level, from 7-12.
Image 7-Just make a reverse image search on the Yandex engine, Image 8, Image 9, Image 10, Image 11, Image 12-Just make a reverse image search on the Yandex engine.
Want more? Make a reverse search on the Yandex engine for any of these images and you will be introduced to many more!
Chechenia, Dagestan, Afghanistan, Yemen, Syria Mountains- Search for these entries on any search engine.
Thank you for reading my Guide!
This Guide is public so feel free to share it!
follow me on Twitter.
January 2023.